
i
TABLE OF CONTENTS
TABLE OF CONTENTS ...................................................................................... I
PART I: BASIC MICROSOFT WORD TOOLS ........................................................ 1
PAGE BREAKS ........................................................................................... 1
SECTION BREAKS ...................................................................................... 2
STYLES .................................................................................................... 5
TABLE OF CONTENTS ................................................................................. 8
LIST OF TABLES / LIST OF FIGURES .......................................................... 10
PART II: FORMATTING REQUIREMENTS: MAKING CORRECTIONS ....................... 13
TITLE PAGE ............................................................................................ 13
Make sure you list your degree and subtrack as they are listed on MyUI.
If you have an official subtrack, it can be included in parentheses after
your degree. ...................................................................................... 13
List the correct month and year of your graduation. ................................ 13
Include the names of your committee members, List your thesis
supervisor(s) first, and designate them as your Thesis Supervisor(s)......... 13
There should be no page number on the Title Page. ................................ 13
COPYRIGHT ............................................................................................ 14
The copyright date is the year of graduation........................................... 14
There should be no page number on the Copyright Page. ......................... 14
PRELIMINARY PAGE NUMBERS .................................................................. 14
Begin preliminary page numbers on the first page following the
unnumbered preliminary pages............................................................. 14
Preliminary page numbers begin with a lower-case Roman numeral ii and
run consecutively throughout the preliminary pages. ............................... 15
Page numbers should be centered in the footer, ½ to 1 inch above the
bottom of the page. ............................................................................ 15
HEADINGS .............................................................................................. 16
Major headings should be consistently formatted in a professional
manner. Each subheading order should be consistently formatted in a
professional manner. ........................................................................... 16
ii
Spacing around major headings should be consistent throughout the
preliminary pages and the manuscript text. Spacing around subheadings
should be consistent throughout. .......................................................... 17
Different order subheadings should have a distinct style. ......................... 18
Headings may not be placed at the bottom of the page without at least
two lines of text below them. ............................................................... 19
TABLE OF CONTENTS ............................................................................... 19
All major headings from the manuscript must be included. Entries should
be consistently spaced. ........................................................................ 19
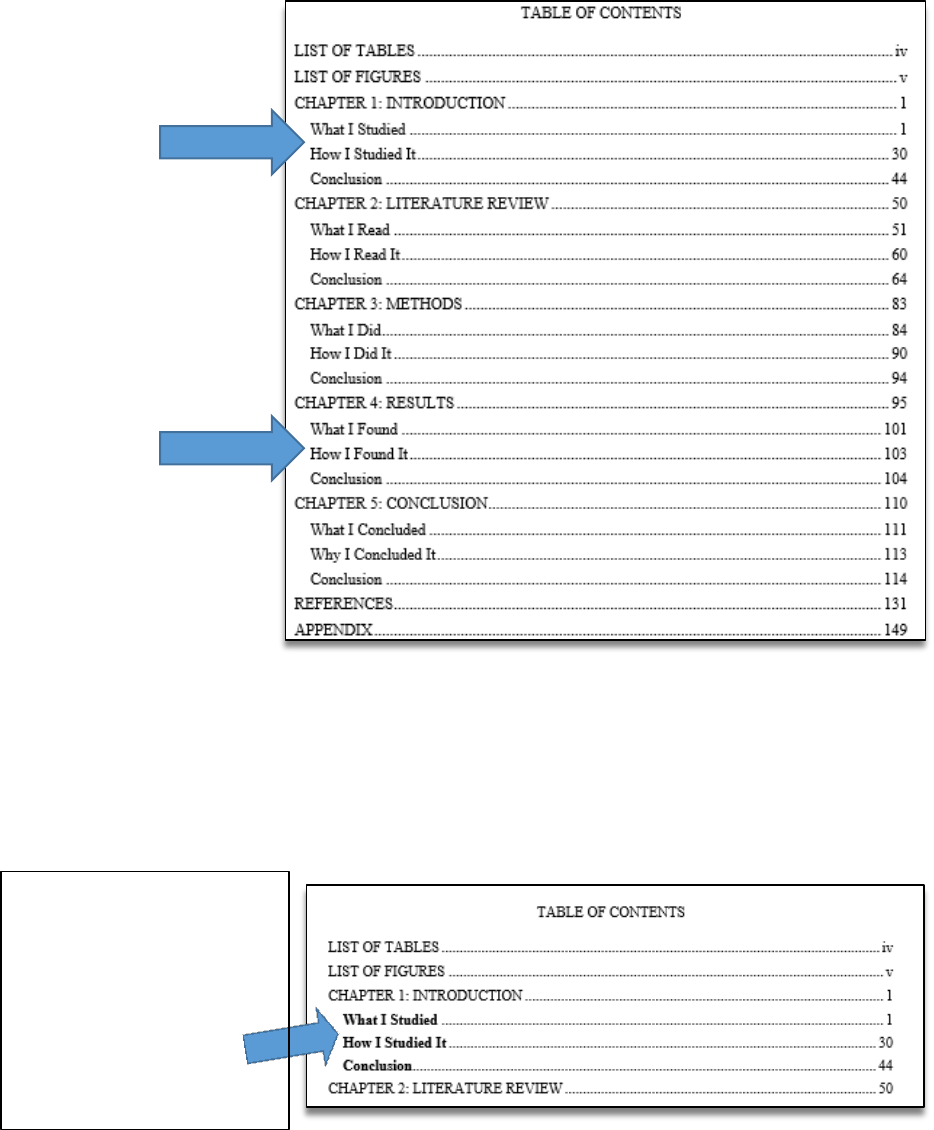
The entries here must match corresponding titles in the text, but should
not carry over boldface, italics, or underlining from the text. .................... 20
Do not include the preliminary pages that include or come before the
Table of Contents. Do not include an entry for the Table of Contents in
the Table of Contents. ......................................................................... 22
Page numbering for the List of Tables / List of Figures entries should be
lower-case Roman numerals. ................................................................ 22
Page numbers listed should be accurate. ............................................... 23
Entries should not run into the page number column. .............................. 23
Page numbers should be vertically aligned by the rightmost digit. ............. 25
LIST OF TABLES / LIST OF FIGURES .......................................................... 27
Entries should be single-spaced, with a double space between them. ........ 27
Captions listed must match corresponding captions in the text, but should
not carry over boldface, italics, or underlining from the text. .................... 28
Pages numbers listed should be accurate. .............................................. 30
Entries should not run into the page number column. .............................. 30
Page numbers should be vertically aligned by the rightmost digit. ............. 31
TABLES / FIGURES .................................................................................. 32
Table captions must not extend beyond the width of the table it is
describing. ......................................................................................... 32
If a table continues to one or more following pages, the number with a
“continued” notation (e.g. Table 3—continued) is placed on each page
after the first. The descriptive title is not repeated in part or full on
continuation pages. A separation line is not required. .............................. 32
REFERENCES / NOTES.............................................................................. 33
The References heading should be treated / formatted as a major
heading and included in the Table of Contents. ....................................... 33
iii
References should be single-spaced, and indenting conventions should be
consistent. ......................................................................................... 34
There may be a single- or double-space between entries. ........................ 35
Entries should not break across a page. ................................................. 36
1
PART I: BASIC MICROSOFT WORD TOOLS
The following information is intended to help you understand and implement a
variety of Microsoft Word tools that will make formatting your thesis easier.
PAGE BREAKS
A page break is a marker in Word that tells your document that whatever follows
the break should begin at the top of a new page. Imagine you are at the end of a
chapter in your manuscript and you want to start the next chapter on a new page.
A lot of times students use the return key to get down to the top of the next page.
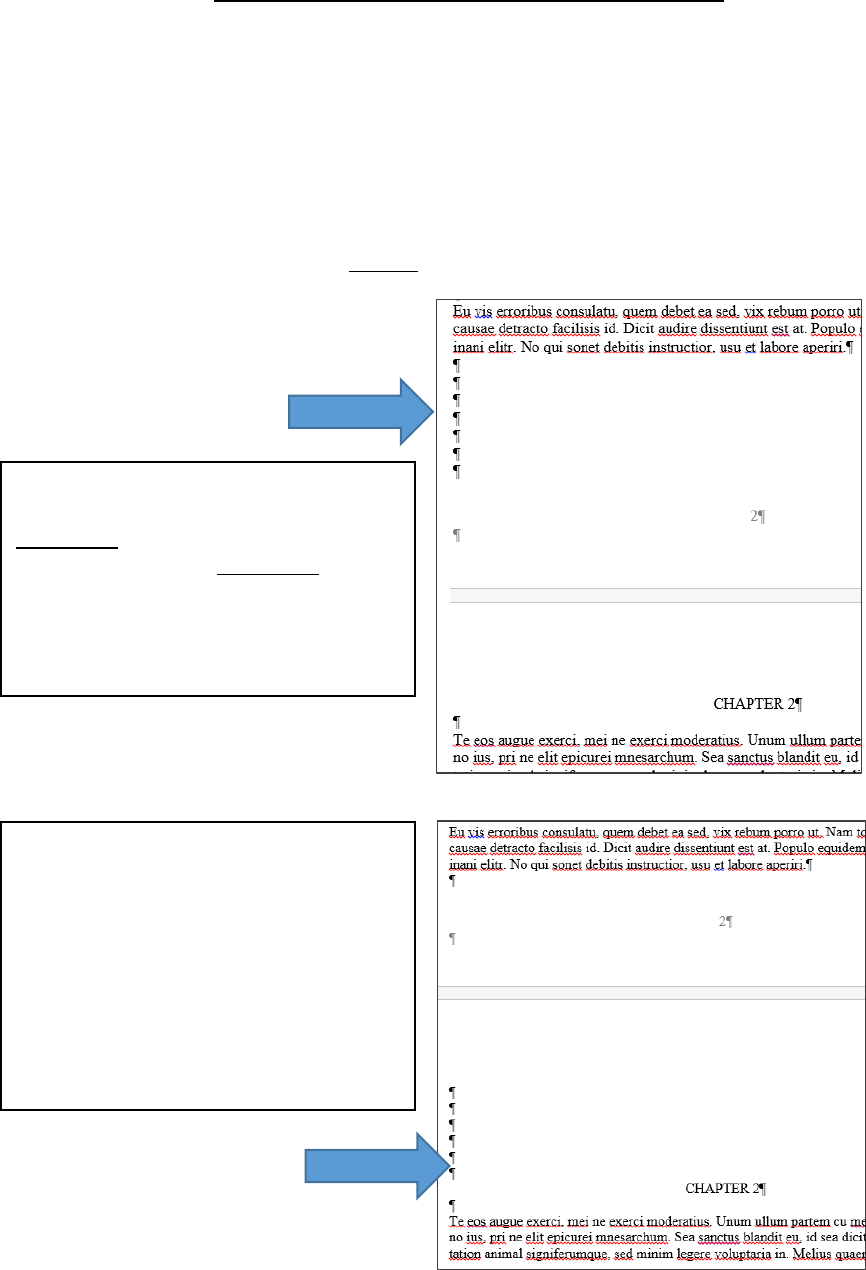
Keeping with our example, let’s
say you add text to the end of
Chapter 1, and so Chapter 1 now
ends at the bottom of the page,
not the middle. See what happens
to the beginning of Chapter 2.
Chapter 2 slides down the page,
and your major heading is no
longer top-aligned.
If you turn on the paragraph
markers in the document,
returning down looks like this.
The problem with returning to a
new page is that, when you make
edits or add text, Word doesn’t
know to keep your subsequent
text at the top of the next page.

2
To insert a page break, simply press shift + fn + return.
Or, you can insert a page break this way:
SECTION BREAKS
Although section breaks may be a little bit trickier than page breaks, understanding
how they work can save you a lot of time. For example, section breaks allow you to
shift both the location and appearance of page numbers.
To shift from non-numbered Preliminary Pages (Title Page, Copyright) to numbered
Preliminary Pages (everything that follows), insert a section break at the bottom of
your Certificate to separate it from the page that immediately follows, using the
step above.
Insert a section break by
clicking Insert, Break,
Section Break (Next
Page). This will start your
next section on the
following page.
3
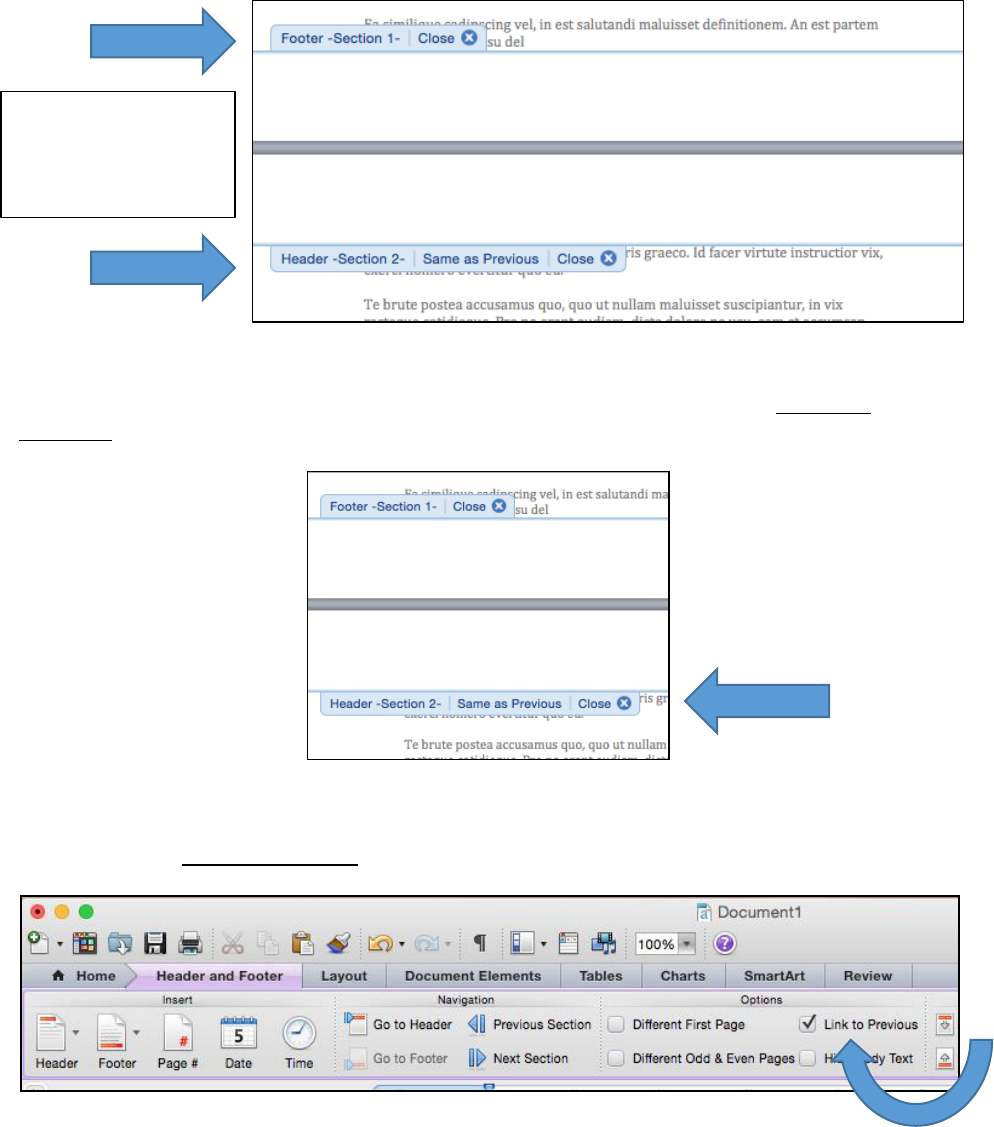
To ensure that each section has its own distinct footer style (where your page
number will go), click on the Section 2 footer. Here you will see the Same as
Previous tab:
This tab lets you know that Word is set up to keep the document’s footers
consistent, despite the introduction of different sections. To turn this function off,
simply unclick Link to Previous, found here:
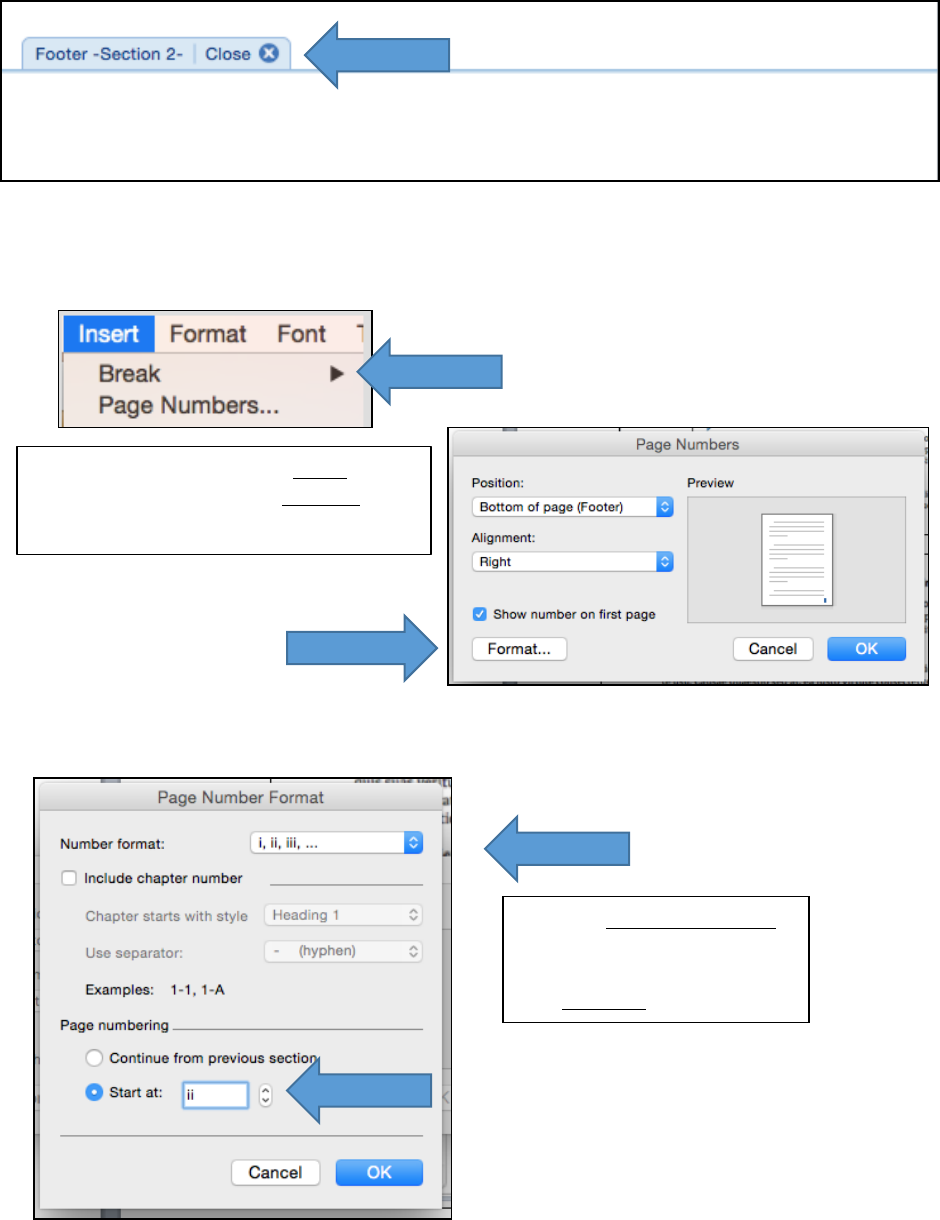
This breaks the connection between the footers in different sections, allowing you
to place different page number styles into your footers:
Double click on
the footer, and
you will see the
different sections.
4
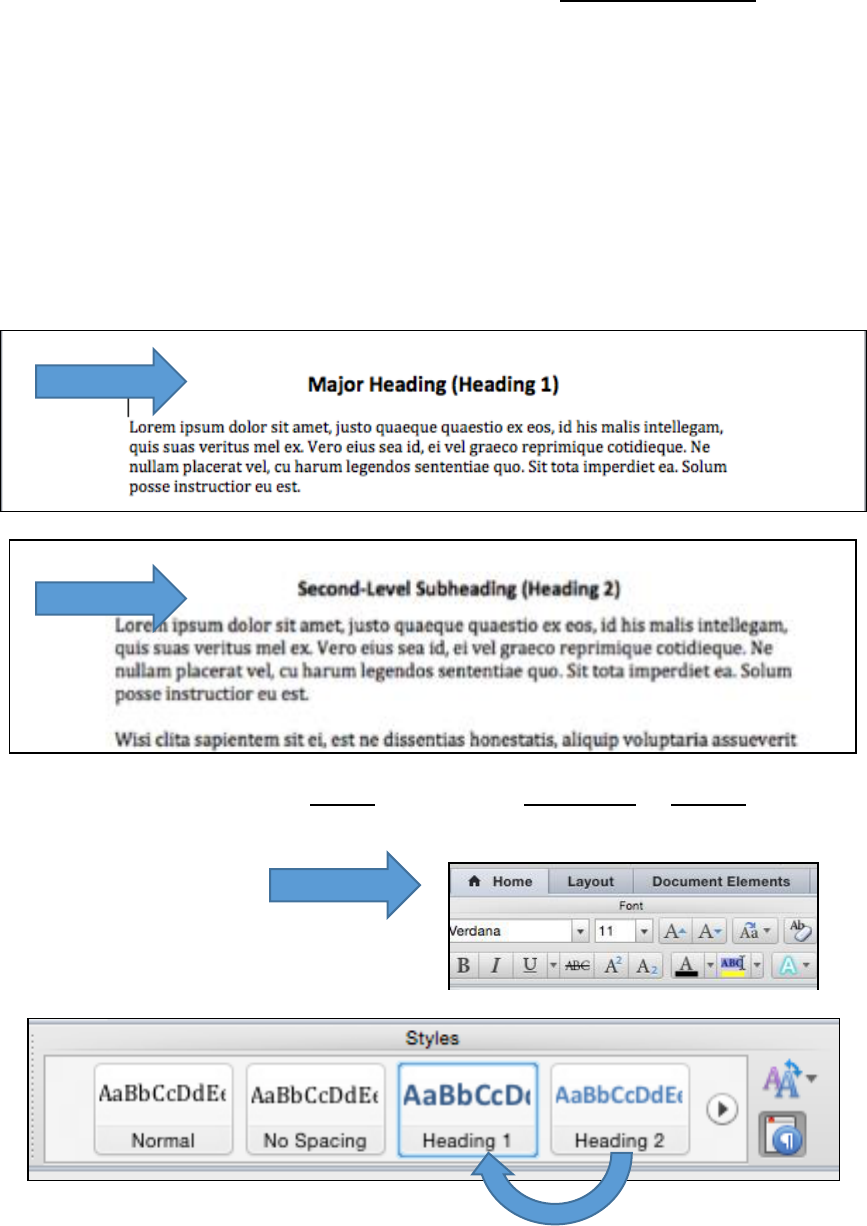
You are now ready to insert page numbers into your Preliminary Pages, starting
with the page immediately following your non-numbered Preliminary Pages. The
first page number should be a lower-case Roman numeral ii.
Then format your page number as a Roman numeral, starting at ii:
Next, page numbers in the body of your manuscript should begin with a ‘1’.
Set the Number format
to lower-case Roman
numerals, and then set
the Start at at ii.
Once you’ve clicked on Page
Numbers, click on the Format
button.
5
To begin, insert a section break between your last Preliminary Page and the
beginning of you first chapter. Make sure you unclick Same as Previous, and
format your page numbers to begin on ‘1’, using the steps outlined above.
STYLES
Styles help you to achieve a professional and consistent appearance throughout
your thesis. They also allow you to automatically generate a Table of Contents and
List of Tables and / or List of Figures. Your chapter titles, for example, will be major
headings (Heading 1), while sections within the chapter may be designated second-
level headings (Heading 2).
To apply a Style, highlight the text you want to serve as a heading.
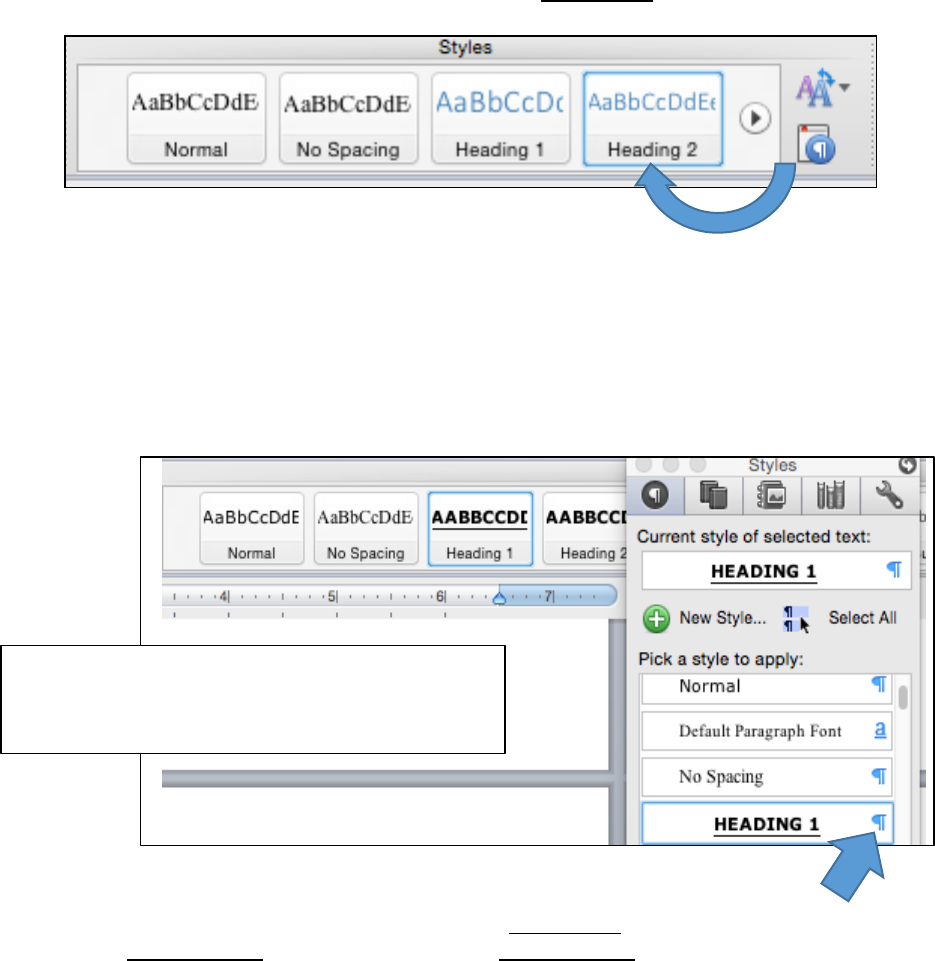
For major headings, under the Home tab, click on Heading 1 in Styles to assign that
style to your heading.
6
For second-level subheadings, do the same thing. Highlight the text you want to
serve as a second-level heading, and assign it a Heading 2 value.
If you don’t like the formatting of your headings or captions (say, you prefer 12-
point font to 10-point, or you want boldface font instead of italics), you can
change the formatting using the Styles tab under the HOME tab. This will eliminate
the need to manually format your headings and captions.
For this example, we will focus on heading styles, knowing that you can change any
sort of style (headings, captions, titles) you’d like. They all work in the same way.
Click on the paragraph marker to the right of Heading 1 to open a drop-down box.
Then, click Modify Style, which will open the Modify Style dialog box, shown below.
Click on Styles (From the HOME tab) and
scroll down to Heading 1, toward the top
of the list.

7
Check: The Document Map Pane is
an easy way to check the formatting
of your headings. It will show your
headings hierarchically, with
subheadings indented below major
headings. To bring up the Document
Map Pane, go to View, Sidebar, and
then Document Map Pane.
You may make
formatting
changes under
the Formatting
options here
and then click
OK.
You may also
make changes
through clicking
on the Format
button at the
bottom of the
page.

8
TABLE OF CONTENTS
Once you have assigned all your headings their appropriate Style, you can generate
your Table of Contents.
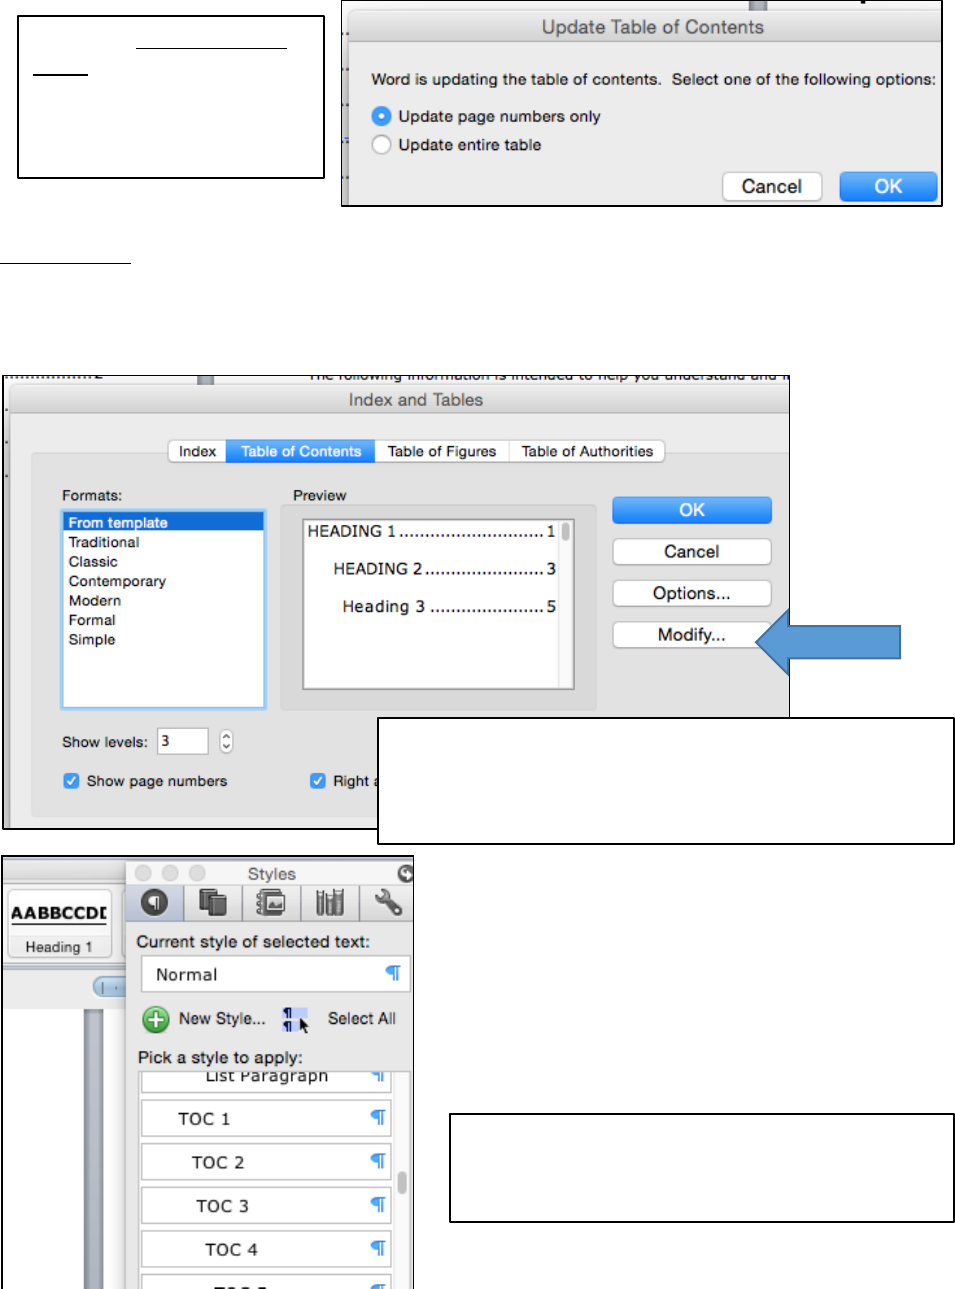
The default Table of Contents setting will include Headings 1 through 3.
Updating your Table of Contents to make sure page numbers are correct and the
headings are accurate is easy. Right click anywhere on the table, and the Update
Field tab will appear.
Under the Insert tab, click Index and Tables.
This will bring up the options that allow you
to insert a Table of Contents or List of Tables
or Figures. Choose Table of Contents.
9
Importantly, the formatting conventions you set for Headings do not transfer to the
formatting conventions set for Table of Contents entries. Table of Contents styles
need to be independently set. This is particularly important if you are writing in a
font style that differs from the Microsoft Word default, Cambria.
Click the Update entire
table tab to update the
entire table. Or, you
may choose to update
the page numbers only.
You can customize your Table by going to Insert,
Index and Tables, and then Table of Contents.
Once here, go to Modify, which will allow you to
change the appearance of the Table entries.
Or, you can modify the Table of Contents
entry styles from the ribbon at the top of
the page.
10
LIST OF TABLES / LIST OF FIGURES
For the purpose of explanation, we will focus on creating a List of Tables, since the
List of Figures works in exactly the same way. Note: Macs use the language of
Table of Figures to refer to these Lists.
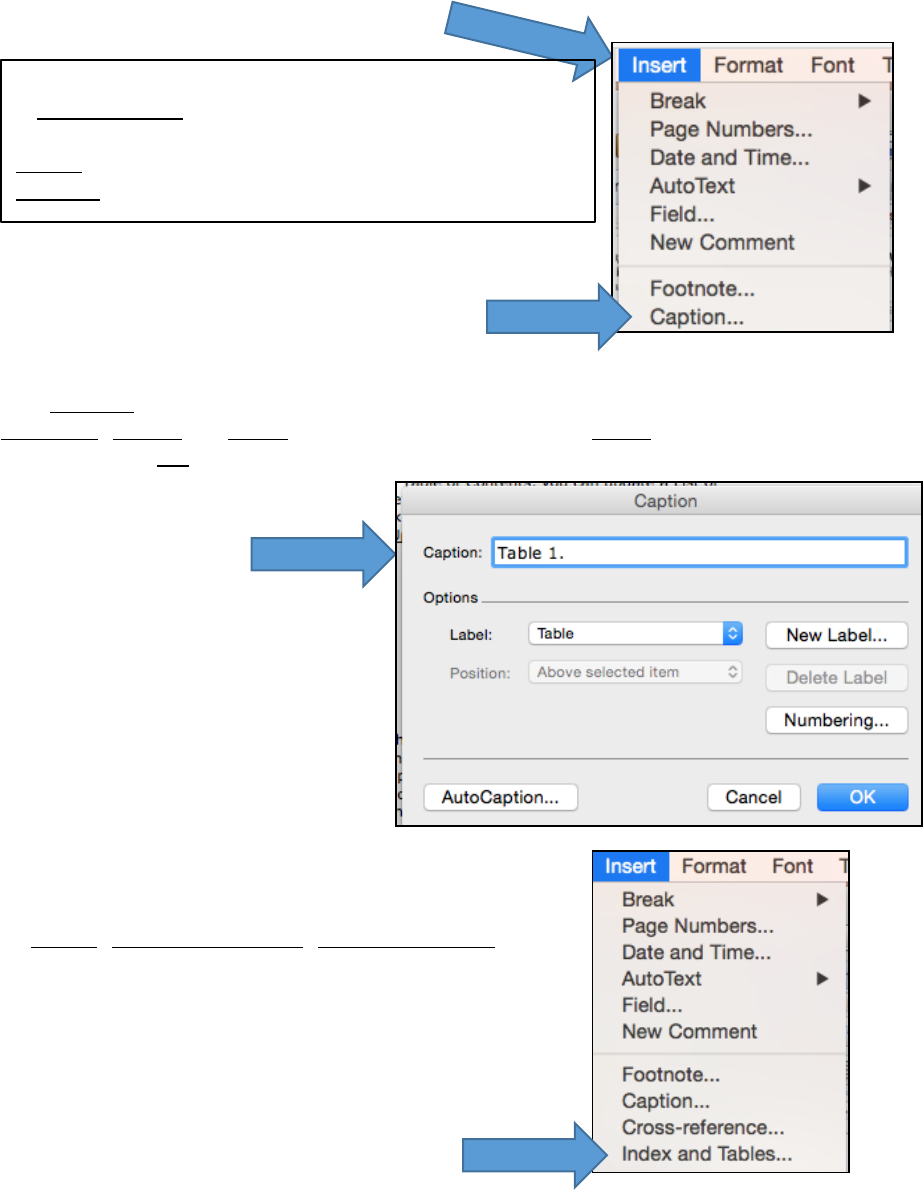
The Caption dialog box will give you a choice of what sort of caption to create:
Equation, Figure, or Table. For our purposes, choose Table. Type in your table
caption. Click OK. Do this for every table caption in your thesis.
You are now ready to create your List of Tables.
On the page following your Table of Contents, go
to Insert, Index and Tables, Table of Figures.
Create a caption for each of your tables. Creating
a List of Tables depends on creating captions that
Word will know to put in your list. Click on the
Insert tab in your toolbar, and then click on
Caption.
11
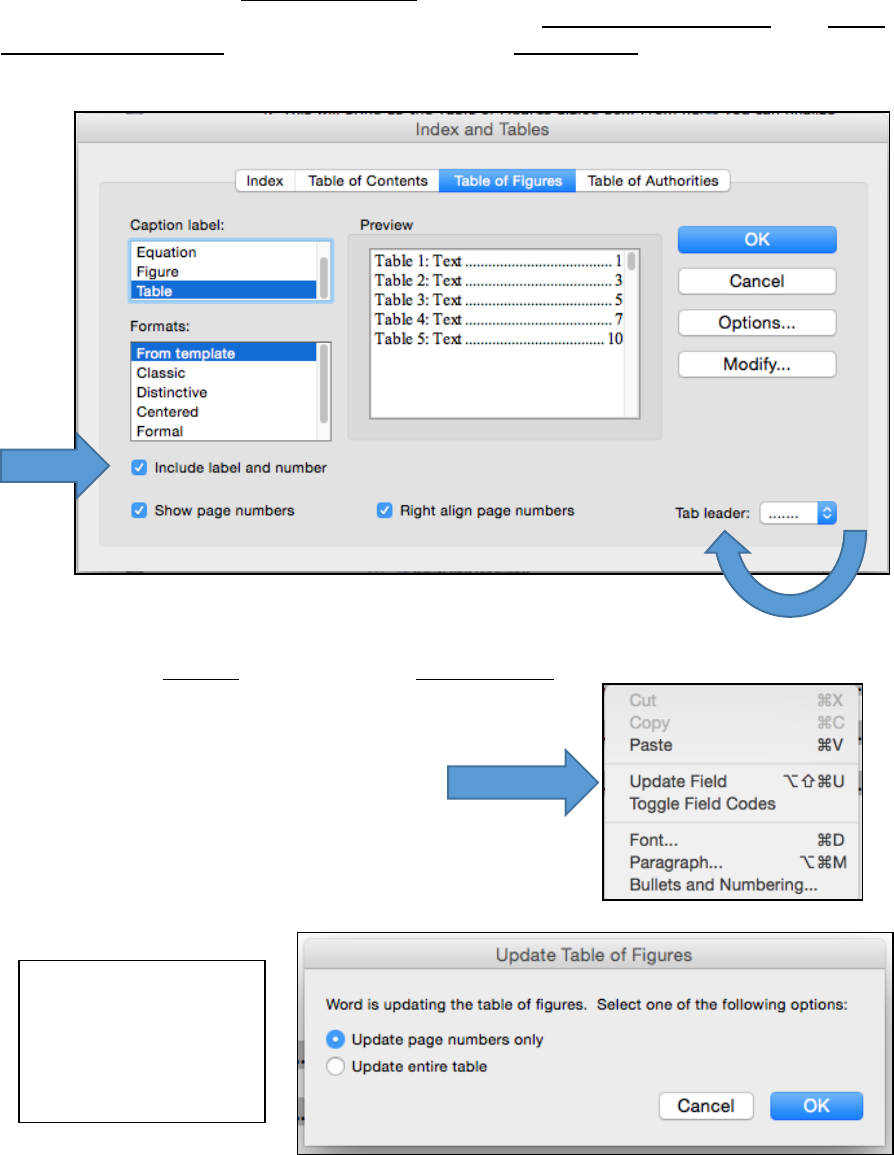
This will bring up the Table of Figures dialog box. From here, you can finalize how
your List of Tables will look. Make sure you click Show Page Numbers and Right
Align Page Numbers. You can also choose the Tab Leader (the dots that connect the
caption entry with its page number) there.
As with the Table of Contents, you can update a List of Tables to reflect any
changes you’ve made to your thesis. Either right click, or click anywhere on your
List and press control, and then click Update Field:
You now have the
option of updating
page numbers only
or updating the
entire table.
12
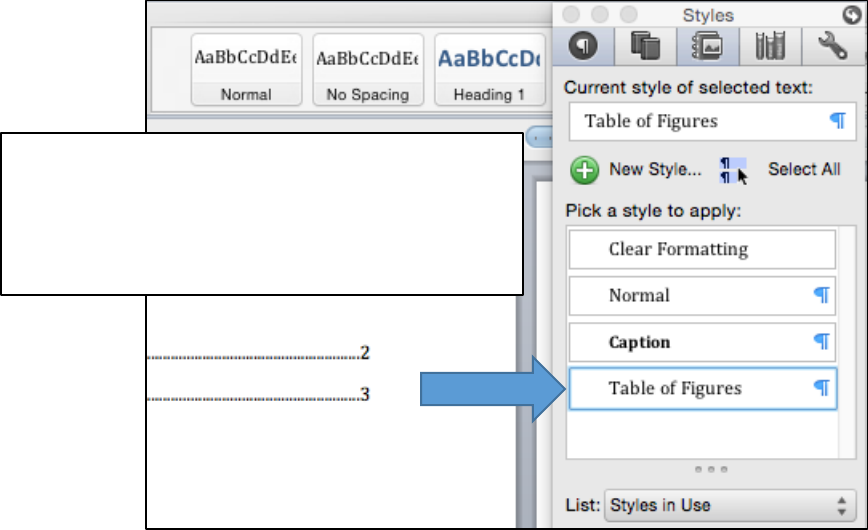
Finally, you may modify the Lists entry
style (Table of Figures) from the ribbon at
the top of the page. This is particularly
important if you are writing in a font that
differs from the default Word font.

13
PART II: FORMATTING REQUIREMENTS: MAKING CORRECTIONS
Following is advice on how to correct common formatting errors. The information is
organized by selected formatting requirement, which allows you to access only
those directions pertinent to your required format corrections.
TITLE PAGE
Make sure you list your degree and subtrack as they are listed on MyUI. If
you have an official subtrack, it can be included in parentheses after your
degree.
Even though it may be commonplace to use your subtrack as shorthand for your
degree, you must list your degree correctly on both your Title Page. The following
degree and subtrack pairings are common, although the list is not comprehensive:
Business Administration (Accounting)
Business Administration (Marketing)
Civil and Environmental Engineering (Structures, Mechanics & Materials)
Educational Policy and Leadership Studies (Higher Education & Student Affairs)
Pharmacy (Medicinal & Natural Products Chemistry)
Pharmacy (Pharmaceutical Socioeconomics)
Pharmacy (Pharmaceutics)
Psychological and Quantitative Foundations (Counseling Psychology)
List the correct month and year of your graduation.
The month and year of your graduation are made up of a) either May, December,
or August and b) the year you are graduating.
Include the names of your committee members, List your thesis
supervisor(s) first, and designate them as your Thesis Supervisor(s).
The Graduate College requires that you list the names of your committee members
on the Title Page of your thesis. Be sure to designate your thesis supervisor by
including the phrase Thesis Supervisor after their name.
There should be no page number on the Title Page.
If there is a page number on your Title Page, it may be that a section break has
been compromised in your preliminary pages. Please review the information on
section breaks in this document.
14
COPYRIGHT
The copyright date is the year of graduation.
If you anticipate a fall graduation, but move your graduation to spring, be sure to
update the copyright year in your thesis. If you are an MSTP student or a student
completing an internship prior to graduation, make sure the year reflects the year
in which you are graduating.
There should be no page number on the Copyright Page.
If there is a page number on your Copyright Page, it may be that a section break
has been compromised in your preliminary pages. Please review the information on
section breaks.
PRELIMINARY PAGE NUMBERS
Begin preliminary page numbers on the first page following the
unnumbered preliminary pages.
A section break between the last unnumbered preliminary page and the first page
following is required for the correct placement of the preliminary page numbers.
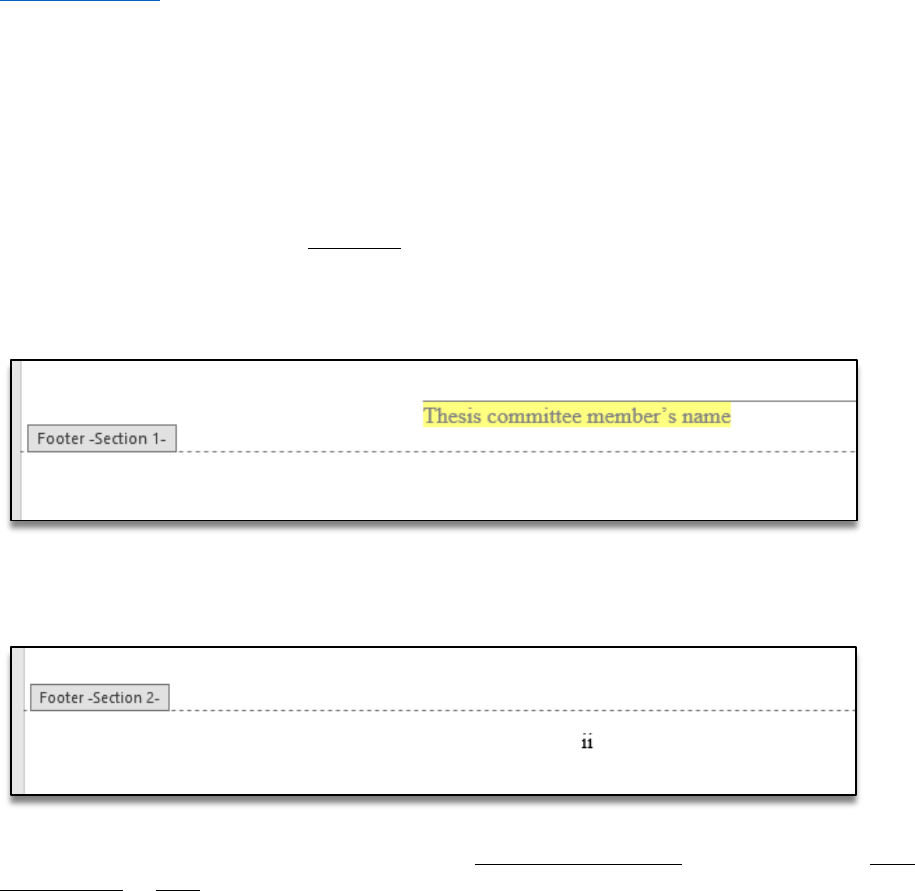
Note: the sections must be unlinked. Check the section breaks in the preliminary
pages by double clicking the footer, which should look like this:
Then, double-click on the footer of the first page following the unnumbered
preliminary page, which should look like this:
In the ribbon at the top of the page, go to Header and Footer, and make sure Link
to Previous is not highlighted.

15
Preliminary page numbers begin with a lower-case Roman numeral ii and
run consecutively throughout the preliminary pages.
If your preliminary page numbers
don’t run consecutively throughout
the preliminary pages, check to
make sure extra section breaks
haven’t been introduced into the
preliminary pages. You can do this
by double-clicking on the footer of
each page.
Page numbers should be centered in the footer, ½ to 1 inch above the
bottom of the page.
Even if your manuscript page numbers appear in a different place on the page,
preliminary page numbers must be centered in the footer.
Now, reinsert page numbers
by double-clicking in the
footer. In the ribbon this will
pull up Header & Footer Tools,
Insert, then Page #.
Or, go to Insert, Page Number,
and insert page numbers from
there.
Follow the directions
immediately above to insert
page numbers. From this
window, you can set the
Number format at Roman
numbers, Start at: ii.

16
HEADINGS
Major headings should be consistently formatted in a professional manner.
Each subheading order should be consistently formatted in a professional
manner.
Major headings include the following: Acknowledgments, Abstract, Public Abstract,
Table of Contents, List of Tables, List of Figures, Chapters, References /
Bibliography, and Appendix. These headings must all be formatted using the same
convention.
This means that if you choose to fully capitalize, center, and use boldface font for
some major headings, you must carry those conventions out throughout the thesis.
Note that you do not need to use the pre-set heading styles set in the preliminary
page template: you may change these so long as you use a consistent convention
throughout the thesis.
Use Styles to ensure consistent heading format. For example, set Heading 1 to
function as your major heading style. In the ribbon at the top of the page, under
the Home tab, go to Styles.
Click the arrow
in the lower
right corner of
the styles
window to
bring up the
Styles pane.
Click on the paragraph symbol to the
right of Heading 1, and go to Modify
Style. Or, simply right click on the
Heading 1 box in the ribbon, and get to
Modify Style that way.

17
Use the same steps to format subheadings, using Heading 2 as your second-level
subheading, Heading 3 as your third-level subheading, and so on. Remember,
headings and subheadings function as a road map to your thesis, helping the reader
understand where they are in the text. For subheadings to work effectively, each
subheading level must carry a consistent format throughout the thesis.
Spacing around major headings should be consistent throughout the
preliminary pages and the manuscript text. Spacing around subheadings
should be consistent throughout.
Here is an example of inconsistent spacing around major headings:
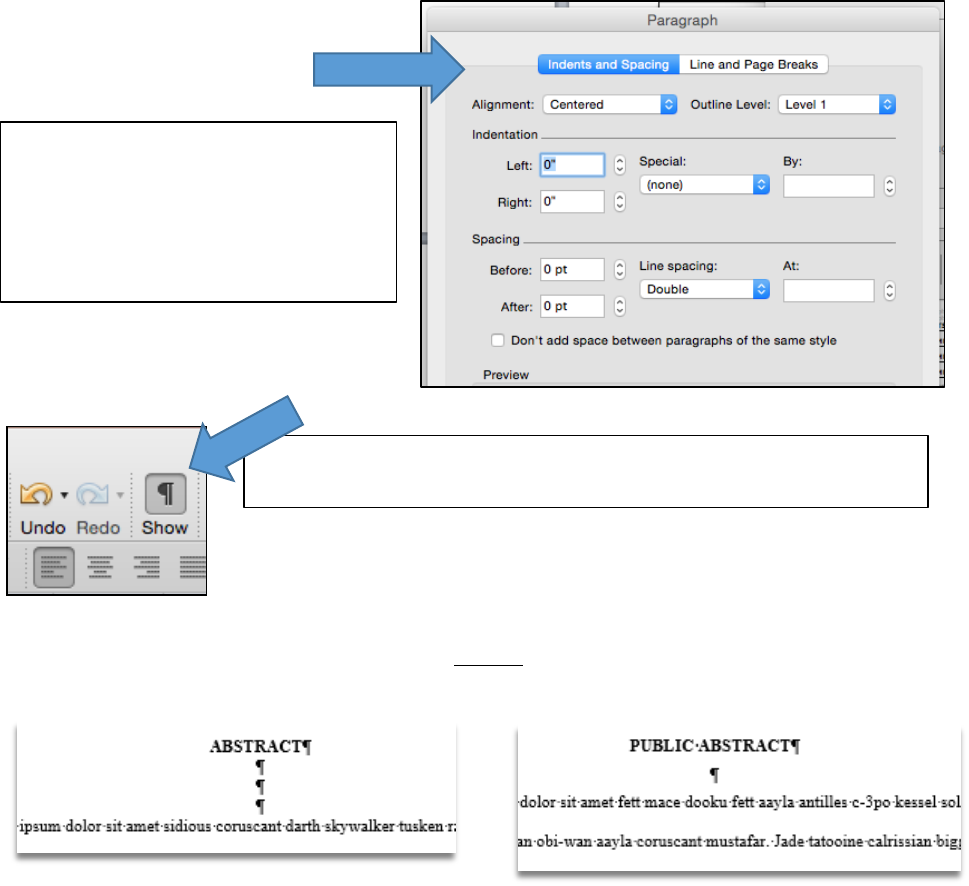
From here, you can format
your major headings using
the conventions you prefer.
You may also use the
Format tab at the bottom of
the window to access
Paragraph. From there you
can alter the spacing
around your headings with
more specificity.
18
The example here shows how using the return key can result in inconsistent
spacing.
Different order subheadings should have a distinct style.
Make sure each subheading level has a distinct style. This helps the reader
understand more clearly the structure of your thesis. You may use italics, boldface
font, numbering, text alignment, or even font size to help differentiate each
subheading level.
To ensure consistent spacing
around major headings and
subheadings, use Styles to
determine spacing (see how to
access Paragraph settings in the
section above).
If you choose to format headings manually, use paragraph
marks to make spacing conventions apparent.
19
Headings may not be placed at the bottom of the page without at least two
lines of text below them.
TABLE OF CONTENTS
All major headings from the manuscript must be included. Entries should
be consistently spaced.
Major headings that must be listed in the Table of Contents include the following:
List of Tables (if applicable), List of Figures (if applicable), Chapters, References /
Bibliography, and Appendix (if applicable).
Note: You may include subheadings in the Table of Contents. If you do so,
however, you must include all instances of a give subheading level. Including
subheadings for one chapter but not another is incorrect.
To keep this error from
happening, make sure the
Paragraph setting on
headings and subheadings
is set as follows:
20
The entries here must match corresponding titles in the text, but should
not carry over boldface, italics, or underlining from the text.
To ensure entries in the Table of Contents match heading / subheading text from
the manuscript, generate your Table of Contents using Word’s automated features.
While you may use
italics or boldface font
as part of your
headings /
subheadings styles,
you may not carry
over those conventions
into your Table of
Contents entries.
21
To correct the error,
highlight the boldface
or italicized font in the
Table of Contents, and
delete the extra
formatting manually.
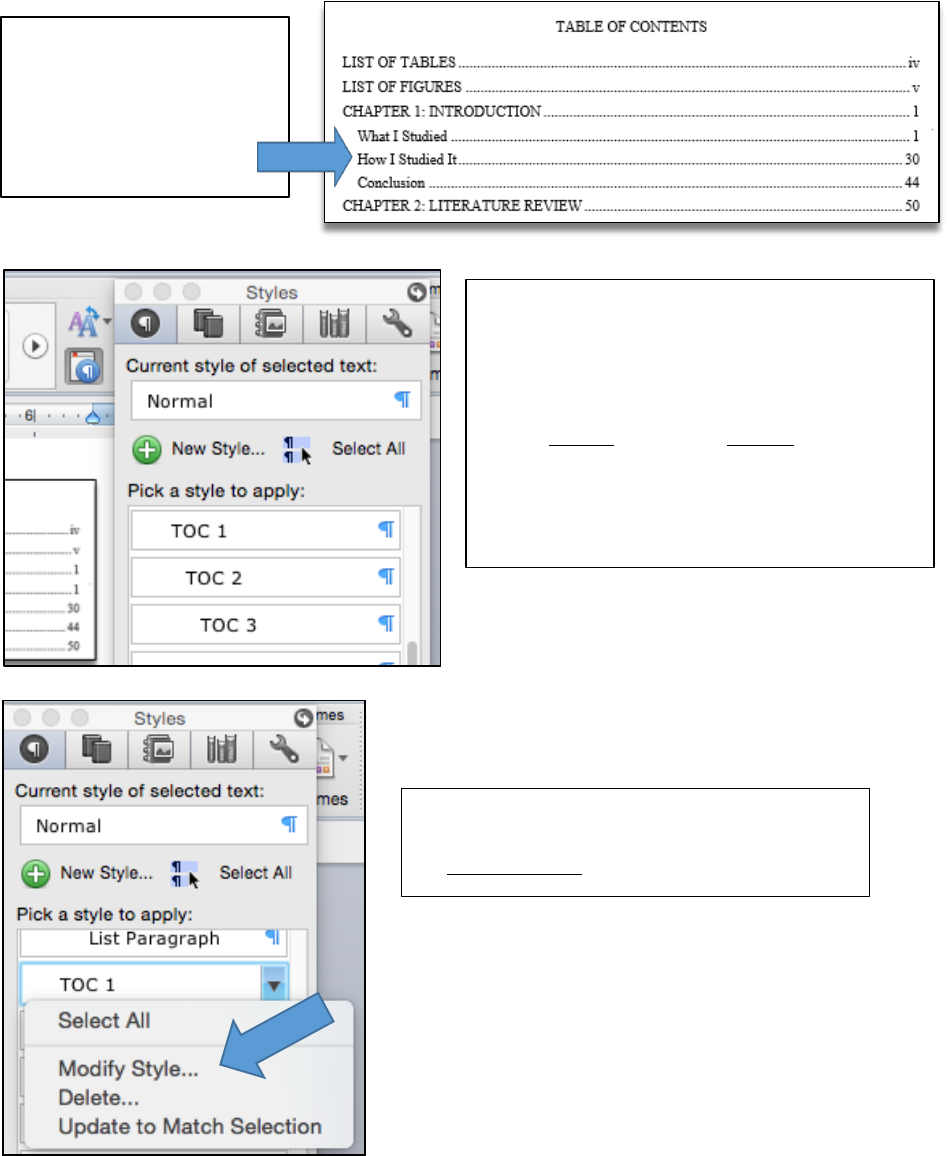
Or, set Styles that will determine the
format of your Table of Contents
entries. Just like headings /
subheadings, the entries in your Table
of Contents are governed by Styles.
Go to Home and then Styles. Click the
arrow in the bottom right corner to pull
up the Styles menu. Scroll down to
locate the styles that govern Table of
Contents entries.
Click the ¶ symbol to the right of the
style you’d like to change, and then go
to Modify Style.
22
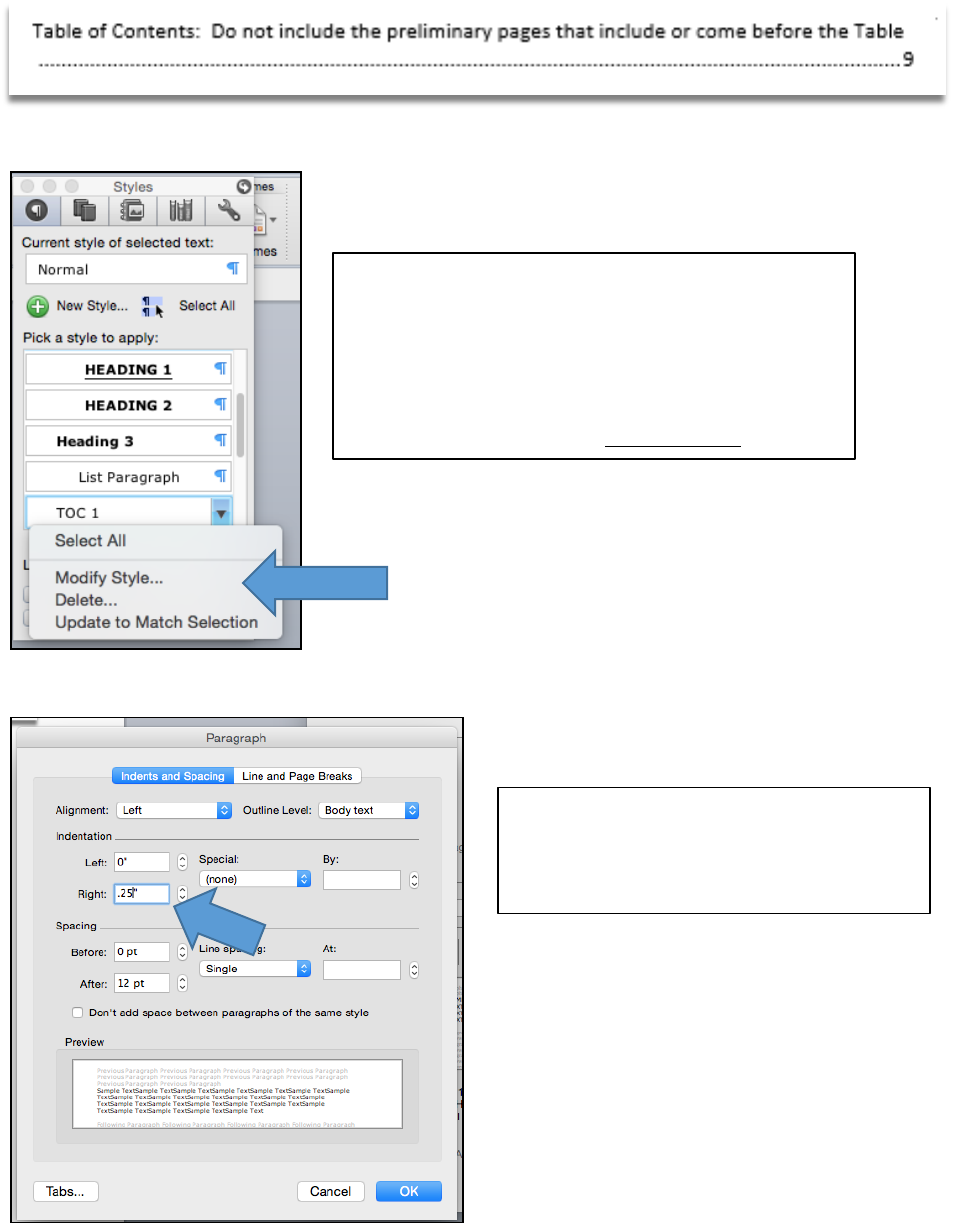
Do not include the preliminary pages that include or come before the Table
of Contents. Do not include an entry for the Table of Contents in the Table
of Contents.
Your Table of Contents should include only those major headings that follow the
Table of Contents page. If you are using Word to generate your Table of Contents,
Word will include all headings that have a Heading 1 style assigned to them, which
may include headings that precede or include the Table of Contents. Should this
happen in your Table of Contents, carefully highlight the entries and delete them.
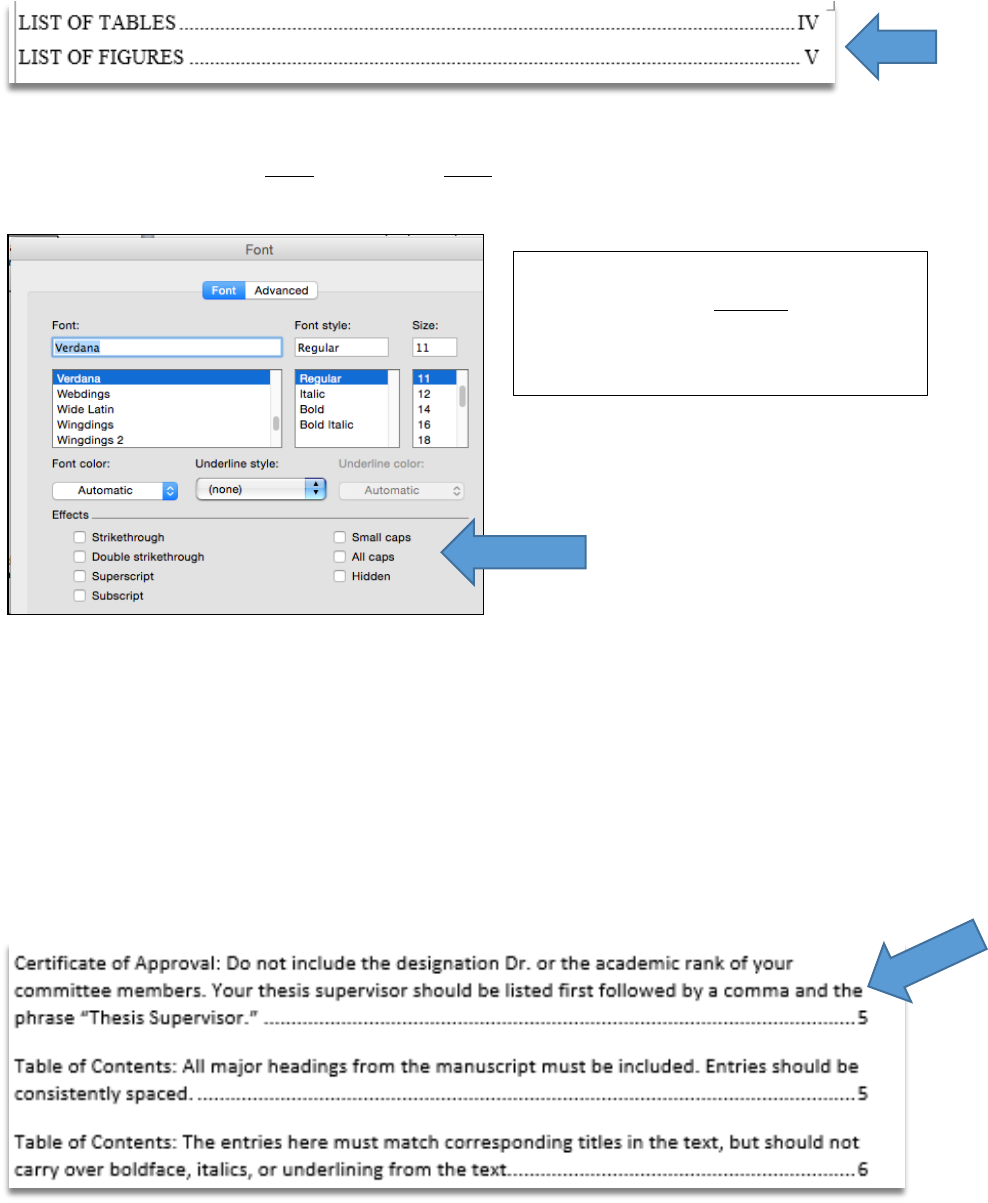
Page numbering for the List of Tables / List of Figures entries should be
lower-case Roman numerals.
Roman numeral page numbers should be lower case in the Table of Contents, like
below.
From there, you may change
the font style, size, color, and
orientation.
23
If you are using Word to generate your Table of Contents, and your Heading 1 style
is set so that the font is fully capitalized, Word will also capitalize the Roman
numeral page numbers, like so.
To correct this error, carefully highlight the Roman numeral you want to change,
right click, and choose Font. Or, select Font from the Ribbon at the top of the
screen.
Page numbers listed should be accurate.
The easiest way to ensure page numbers are accurate is to use Microsoft Word
tools to generate your Table of Contents. Otherwise, you will need to manually
check the page numbers listed against the content of the thesis.
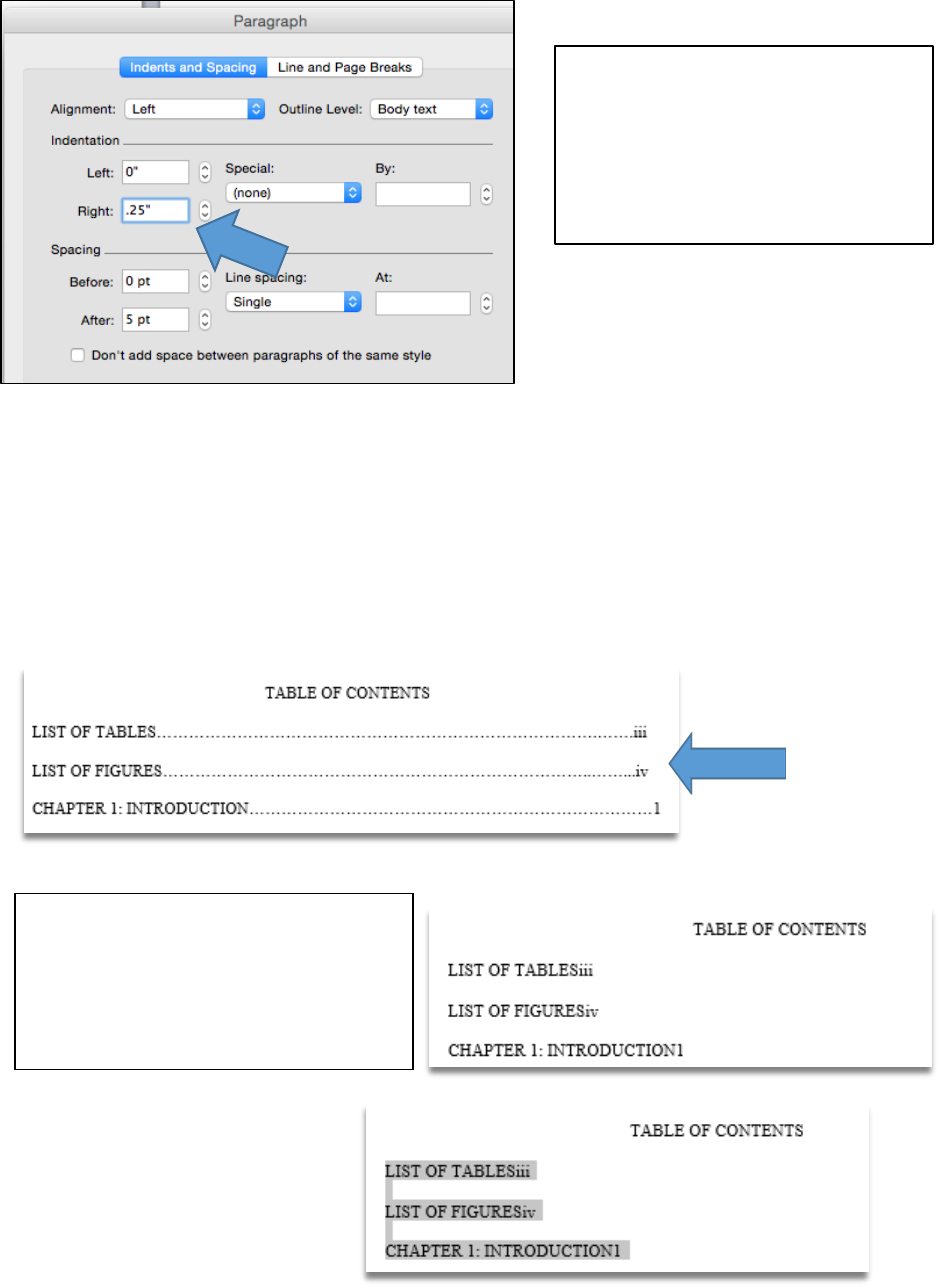
Entries should not run into the page number column.
This error happens when text from the Table of Contents entries interferes with the
page number column, making the page numbers difficult to read.
From there, make sure the All
caps box, under Effects, is not
checked. This should format the
Roman numerals as lower case
letters.
24
The error may also manifest as an entry that includes an entire row of leader lines
(…) without a word on it.
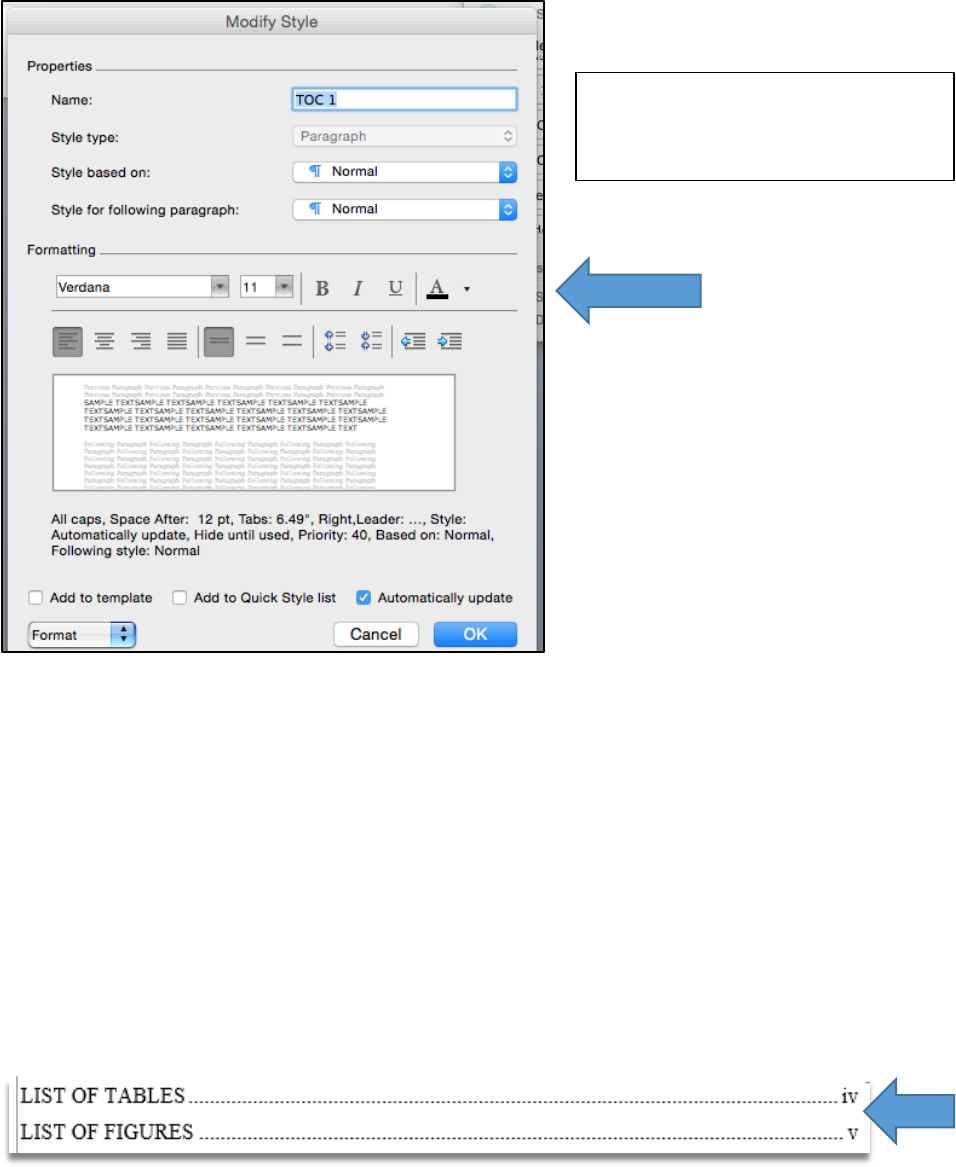
From there, go to Format, and then Paragraph.
If you are using Microsoft Word to generate
your Table of Contents, you can format the
Styles in the Table to prevent the error.
Identify the Styles in your Table of Contents
(in this example TOC 1), hover over the 
symbol to the right of the style you’d like to
change, and then click Modify Style.
Go to Indentation, Right, and set
the right margin at 0.25” or so to
pull the text from the entries out of
the page number column.
25
Finally, if you want to correct the error manually, simply place your cursor at the
beginning of the interfering word, and use the space bar to move the word down a
line of text.
Page numbers should be vertically aligned by the rightmost digit.
To correct this error, generate your Table of Contents using Microsoft Word tools.
Here is an example of page numbers that don’t vertically align:
Then, highlight the entries.
If you are manually constructing
a Table of Contents, you may
set tabs to ensure your page
numbers line up. To begin,
delete any leader lines that have
been inserted manually.
Alternatively, once you’ve
finalized the entries in your
Table of Contents, you may
highlight the entries, go to
Format and then Paragraph in
the ribbon, and shift the right
margin from there.
26
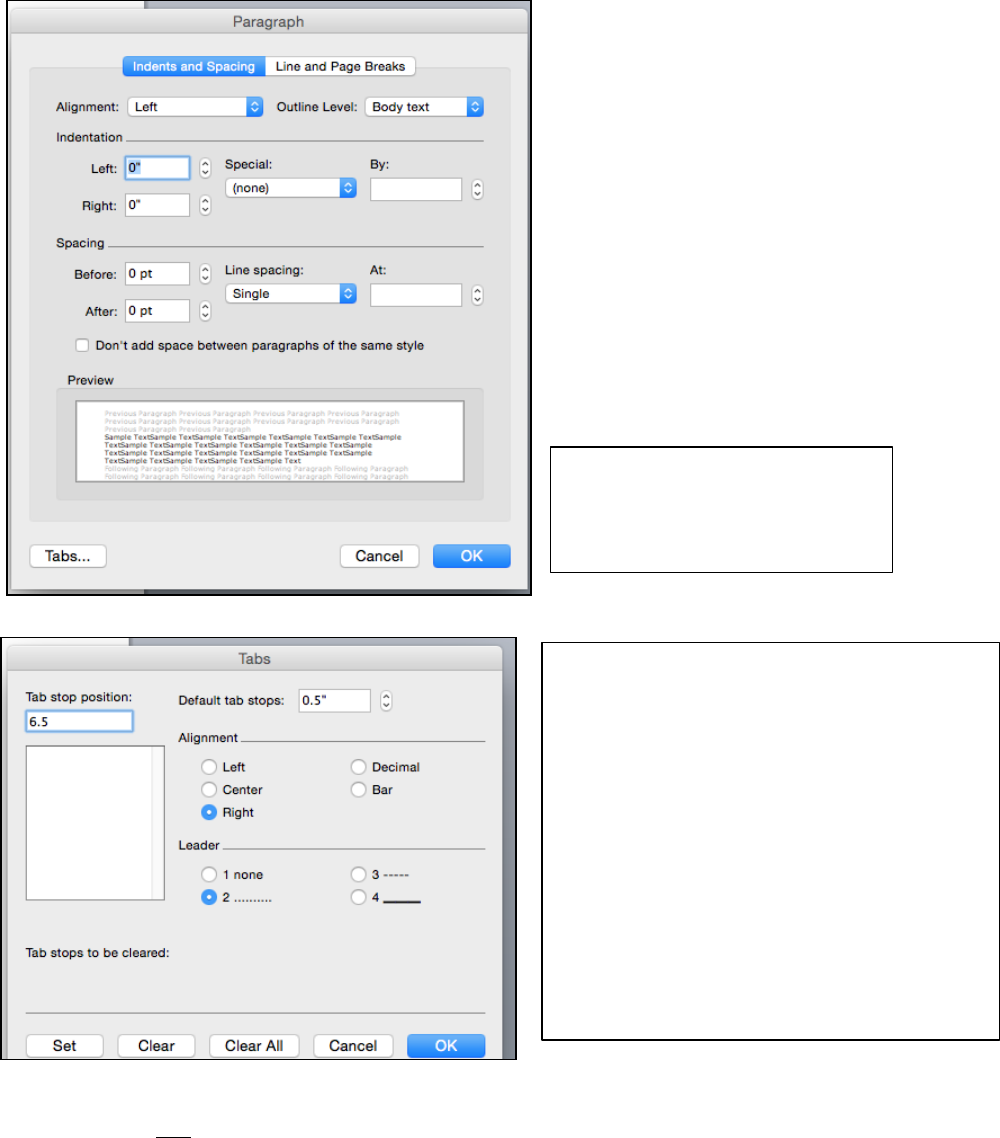
Place your cursor between the end of the Table of Contents entry and the page
number. Hit tab on your keyboard to create the leader line. In this example, the
first two page numbers have been separated. Note the cursor placement in the
third entry.
Go to Format and then
Paragraph in the ribbon at
the top of the page, and
click Tabs.
Make sure you set the following
preferences here:
Tab stop position: Set this at 6.5 if
you have a 1 inch left margin, and at
6.0 if you have a 1.5 inch left margin.
Alignment: Make sure Right is
checked.
Leader: Set this at 2.
Make sure to click Set before you click
OK, or else your settings won’t hold.
27
LIST OF TABLES / LIST OF FIGURES
Entries should be single-spaced, with a double space between them.
This requirement ensures the entries in your List of Tables and/or List of Figures
are easy to read. Here is an example of what single-spaced entries with a double
space between looks like:
If you used Microsoft Word to generate
your Lists, modify the Table of Figures
style to create a correctly formatted List.
28
You may also manually highlight the text in the List, and enter the same settings
from the Format, Paragraph option in the ribbon at the top of the page.
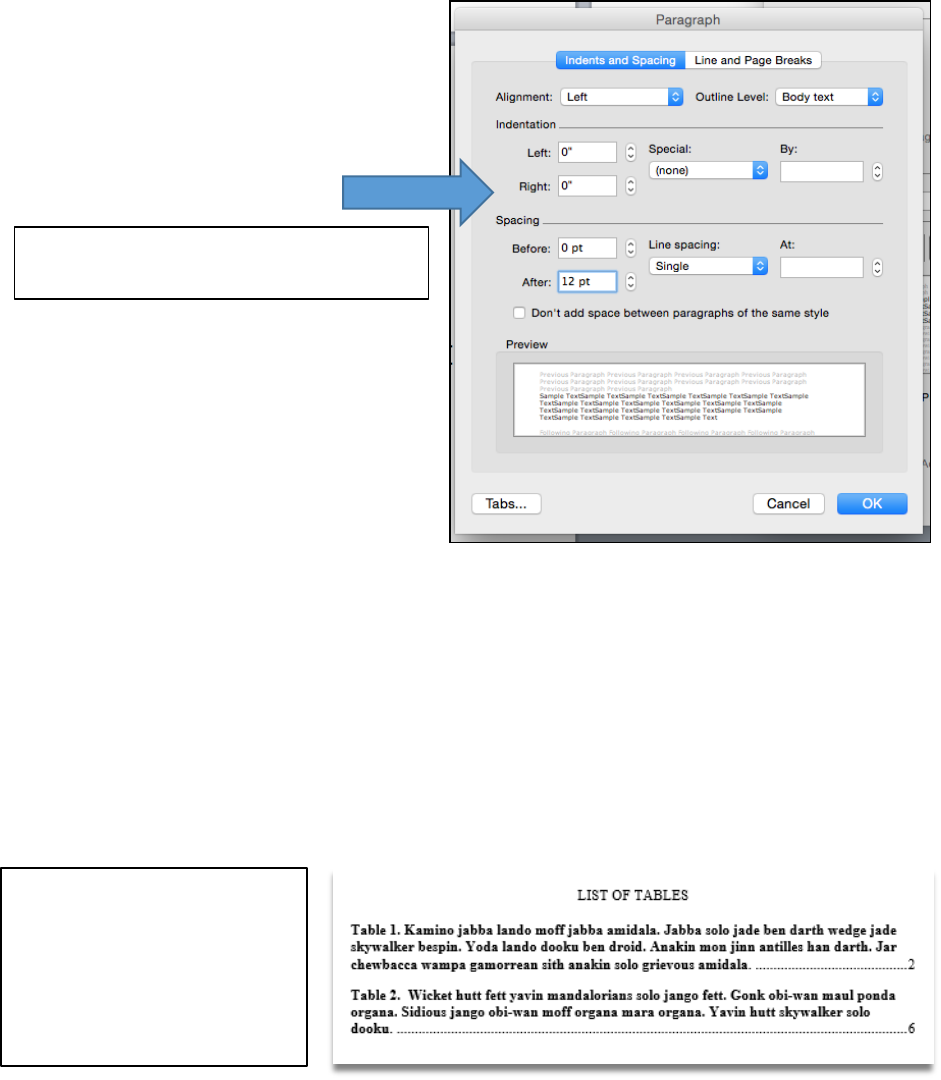
Captions listed must match corresponding captions in the text, but should
not carry over boldface, italics, or underlining from the text.
To ensure entries in the List of Tables / List of Figures match heading / subheading
text from the manuscript, assign Styles to headings / subheadings. Then, generate
your Table of Contents using Word’s automated features.
The Paragraph setting should be
12 pt After, Single Line spacing.
While you may use
italics or boldface font
as part of your caption
styles, you may not
carry over those
conventions into your
List entries.
29
To correct the error,
you may carefully
highlight the boldface
or italicized font in the
Table of Contents, and
then take the extra
formatting out
manually.
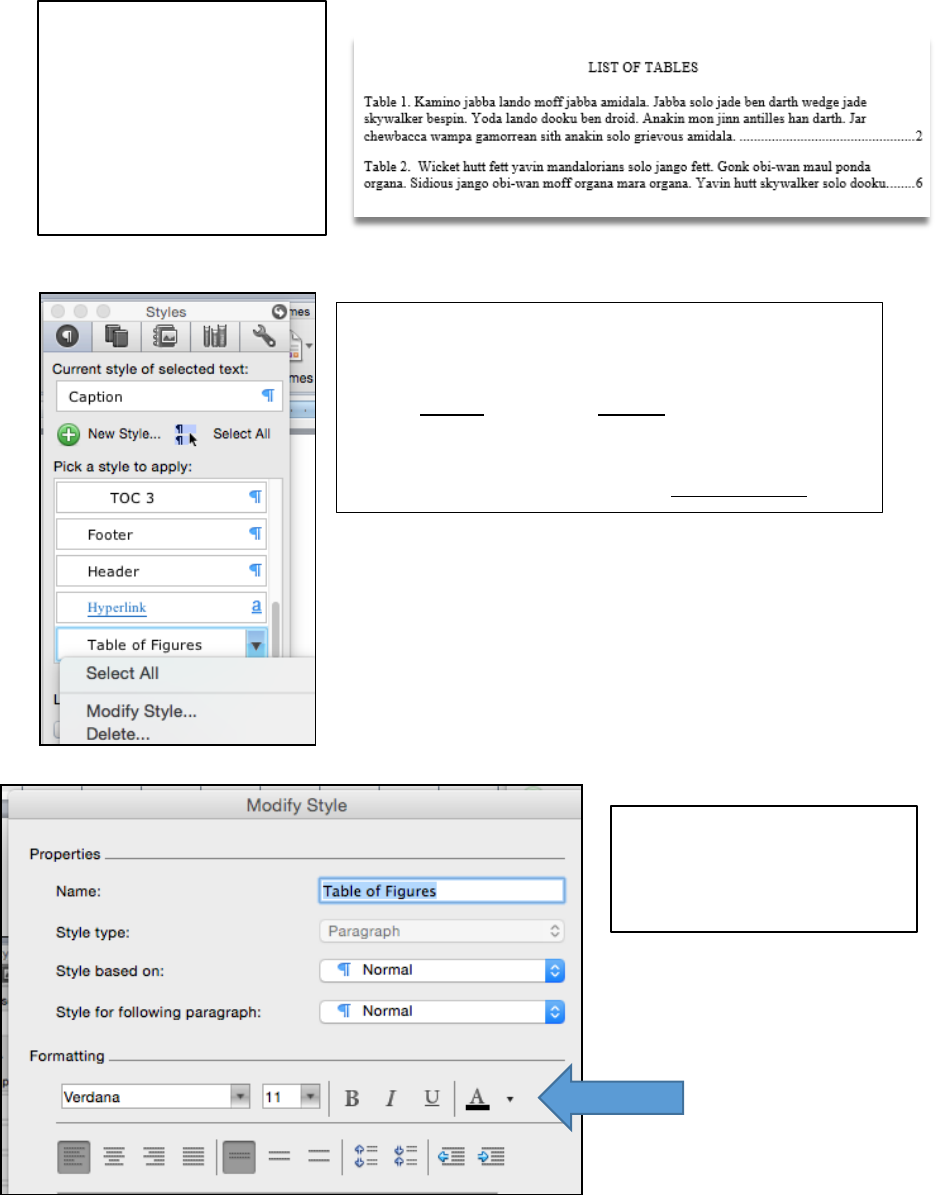
Or, set Styles that will determine the format
of your List entries. Just like captions, the
entries in your Lists are governed by Styles.
Go to Home and then Styles. Click the arrow
in the bottom right corner to pull up the
Styles menu. Scroll down to locate the Table
of Figures style. Then, go to Modify Style.
From there, you may
change the font style,
size, color, and
orientation.
30
Pages numbers listed should be accurate.
The easiest way to ensure page numbers are accurate is to use Microsoft Word
tools to generate your Lists. Otherwise, you will need to manually check the page
numbers listed against the content of the thesis.
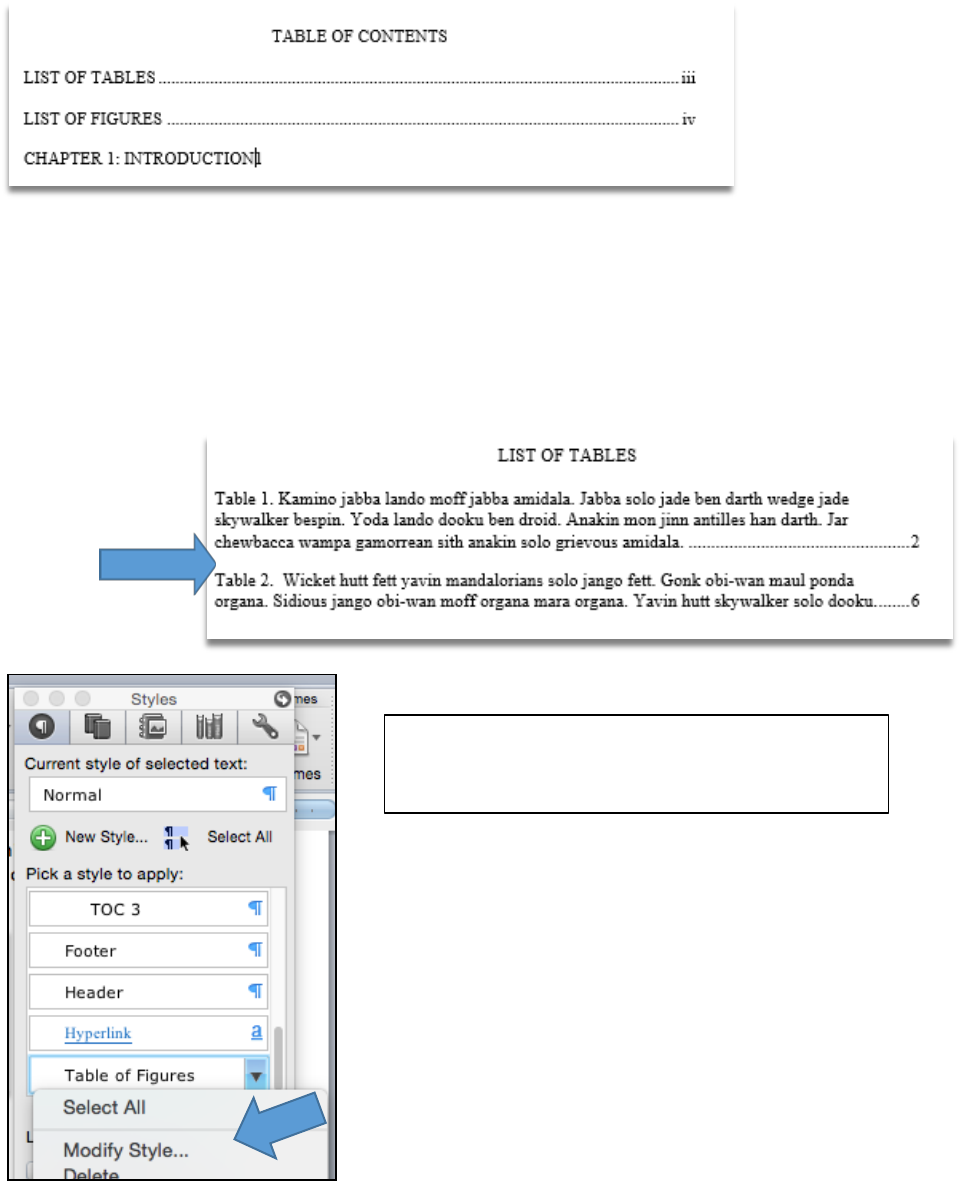
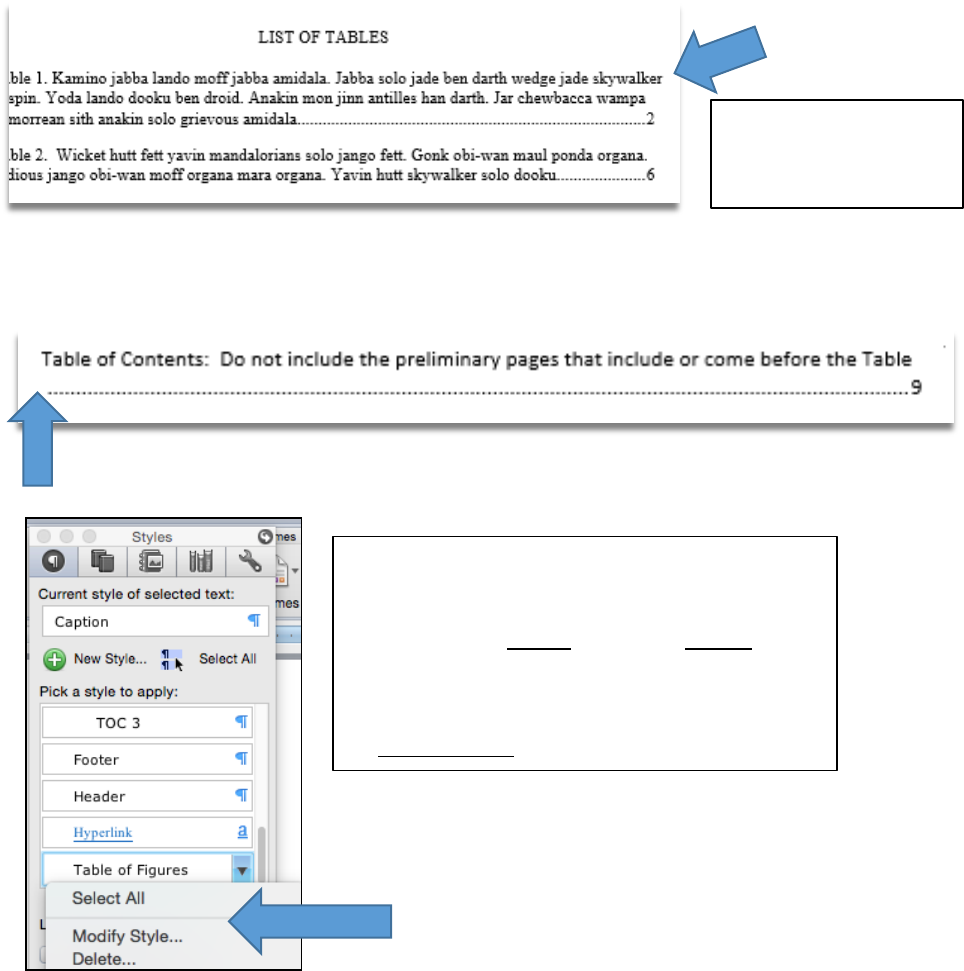
Entries should not run into the page number column.
The error may also manifest as an entry that includes an entire row of leader lines
(…) without a word on it:
This error makes
the page numbers
difficult to read.
Set Styles that will determine the format
of your List entries. Just like captions, the
entries in your Lists are governed by
Styles. Go to Home and then Styles.
Click the arrow in the bottom right corner
to pull up the Styles menu. Scroll down to
locate the Table of Figures style. Then, go
to Modify Style.
31
From there, go to Format, and then Paragraph.
Finally, to correct the error manually, simply place your cursor at the beginning of
the interfering word, and use the space bar to move the word down a line of text.
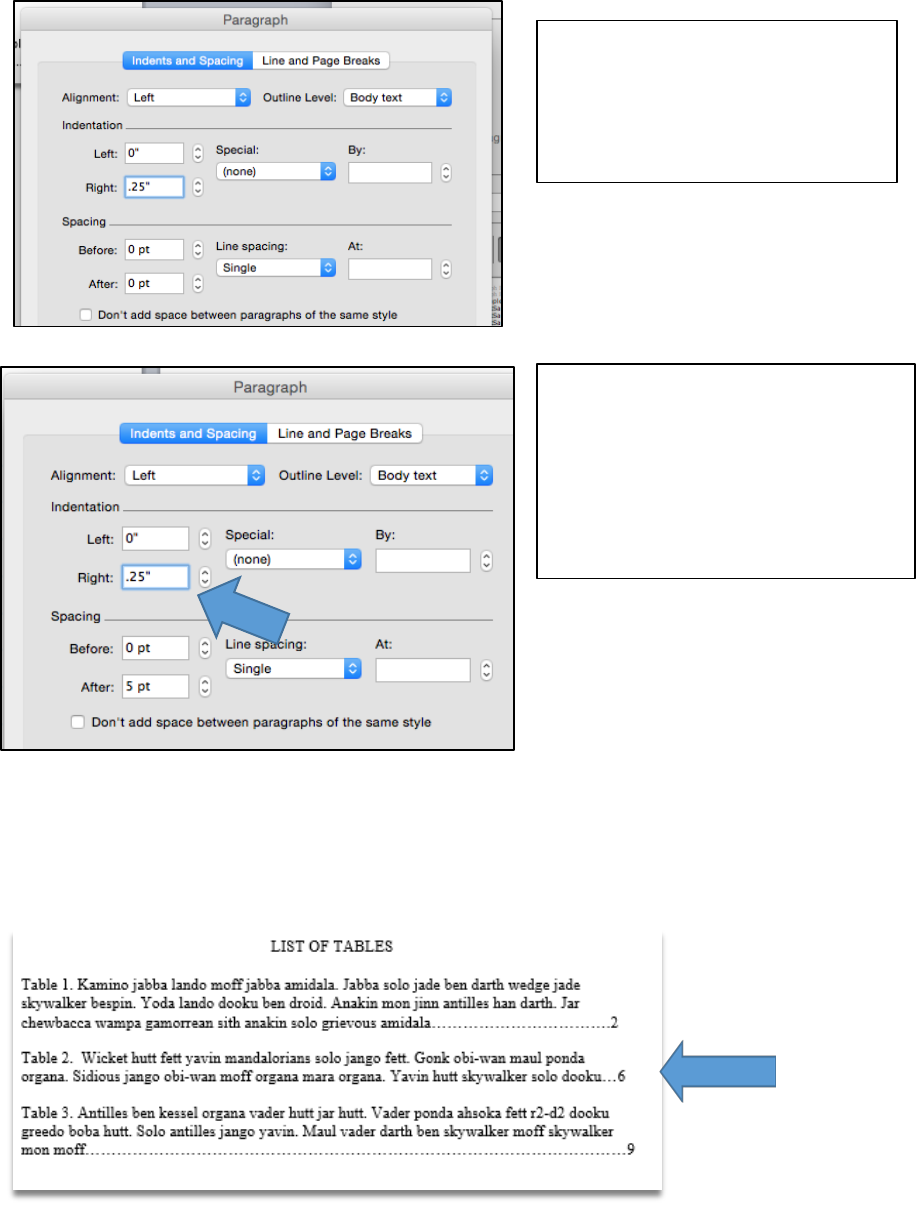
Page numbers should be vertically aligned by the rightmost digit.
Here is an example of page numbers that don’t vertically align:
Go to Indentation, Right, and
set the right margin at 0.25”
or so to pull the text from
the entries out of the page
number column.
Alternatively, once you’ve
finalized the entries in your
Table of Contents, you may
highlight the entries, go to
Format and then Paragraph in
the ribbon, and shift the right
margin from there.
32
To correct this error, generate your Lists using Microsoft Word tools. See the
information here. If you are manually constructing a List, see the information here.
TABLES / FIGURES
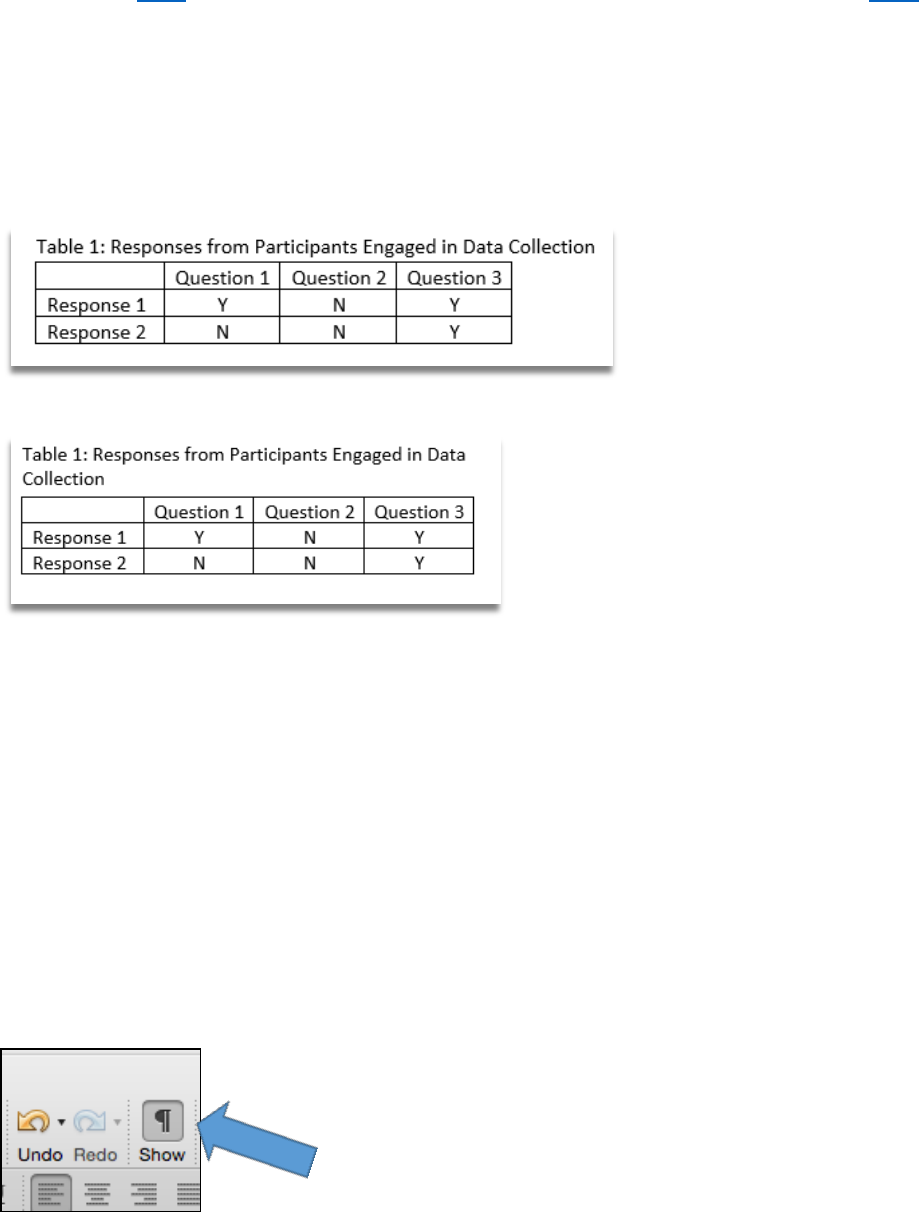
Table captions must not extend beyond the width of the table it is
describing.
A compromise of this formatting requirement looks like this:
The correction looks like this:
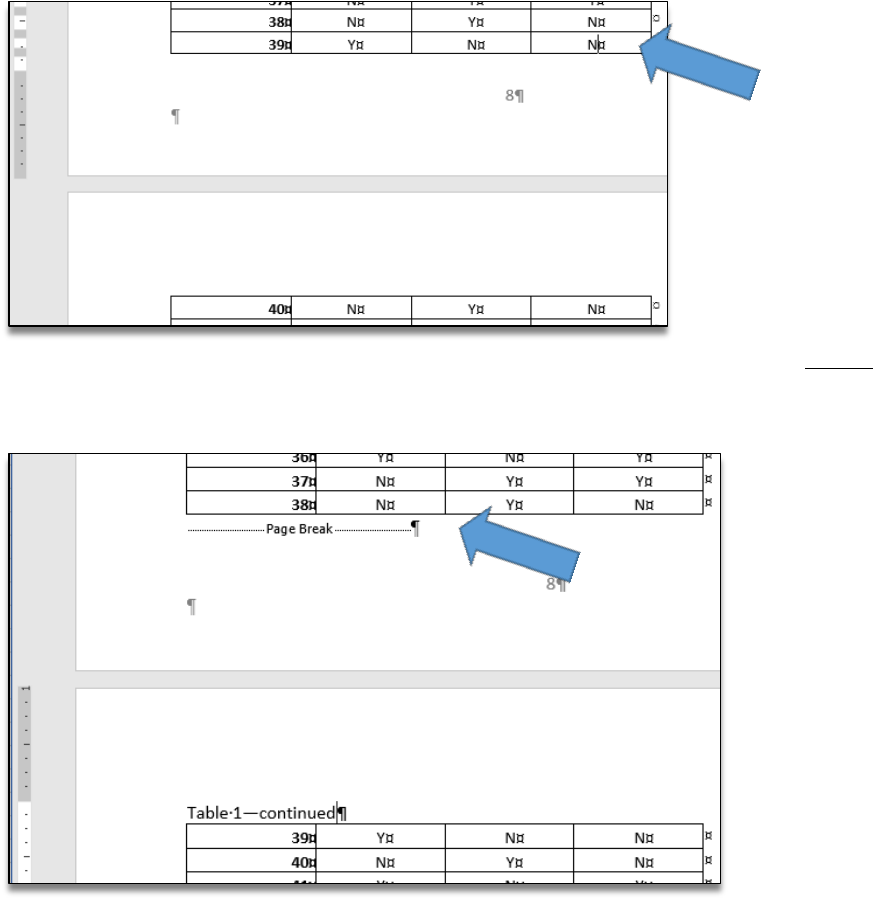
If a table continues to one or more following pages, the number with a
“continued” notation (e.g. Table 3—continued) is placed on each page after
the first. The descriptive title is not repeated in part or full on continuation
pages. A separation line is not required.
Continued tables are those that extend beyond one page. If the table is a page long
or shorter, one solution is to locate the table on its own page. This adheres to the
following formatting requirement: Gaps around tables are allowed if the table is
larger than half a page.
If the previous is not applicable, adding Continued notations at the top of
subsequent pages involves breaking a table so there is space at the top of the
subsequent page to add the caption. To begin, turn on the paragraph marker in the
ribbon so breaks and spaces are visible.
33
Then, locate your cursor behind the contents of the rightmost cell in the row that
falls at the bottom of the first page.
Add a page break (Insert, Break, Page Break). After the Page Break, hit return so
there is space at the top of the page to add the continued notation. Enter the
Continue notation at the top of the subsequent page.
REFERENCES / NOTES
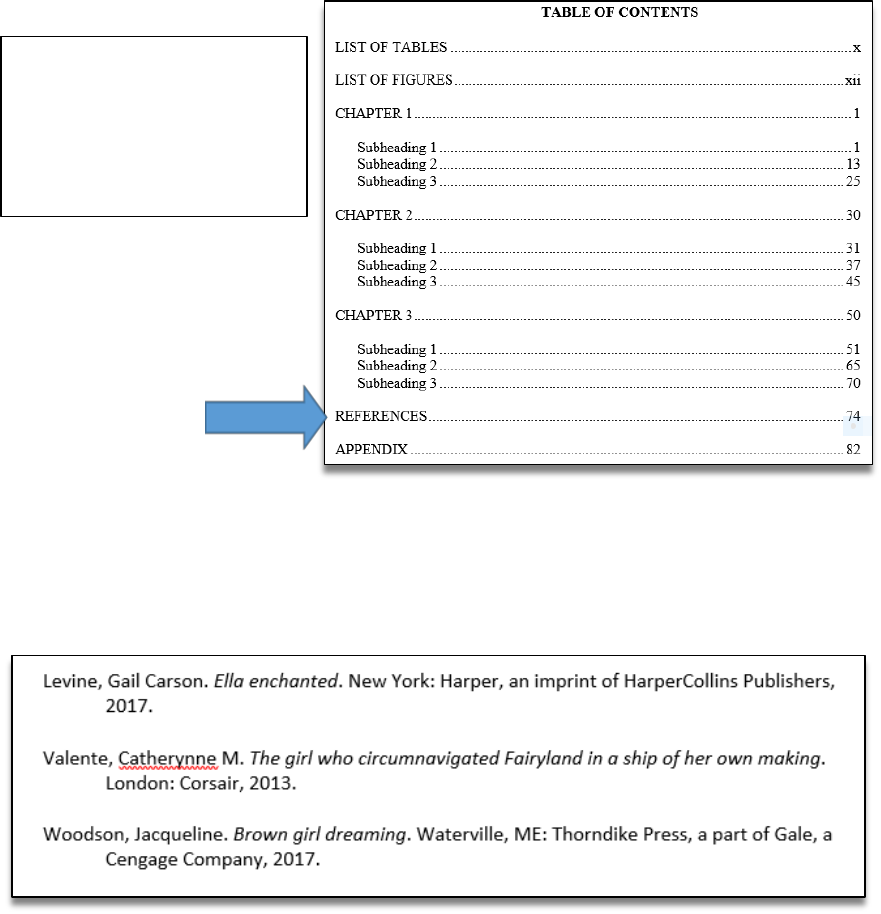
The References heading should be treated / formatted as a major heading
and included in the Table of Contents.
Major headings include the following: Acknowledgments, Abstract, Public Abstract,
Table of Contents, List of Tables, List of Figures, Chapters, References /
Bibliography, and Appendix title. These headings must all be formatted using the
same convention.
34
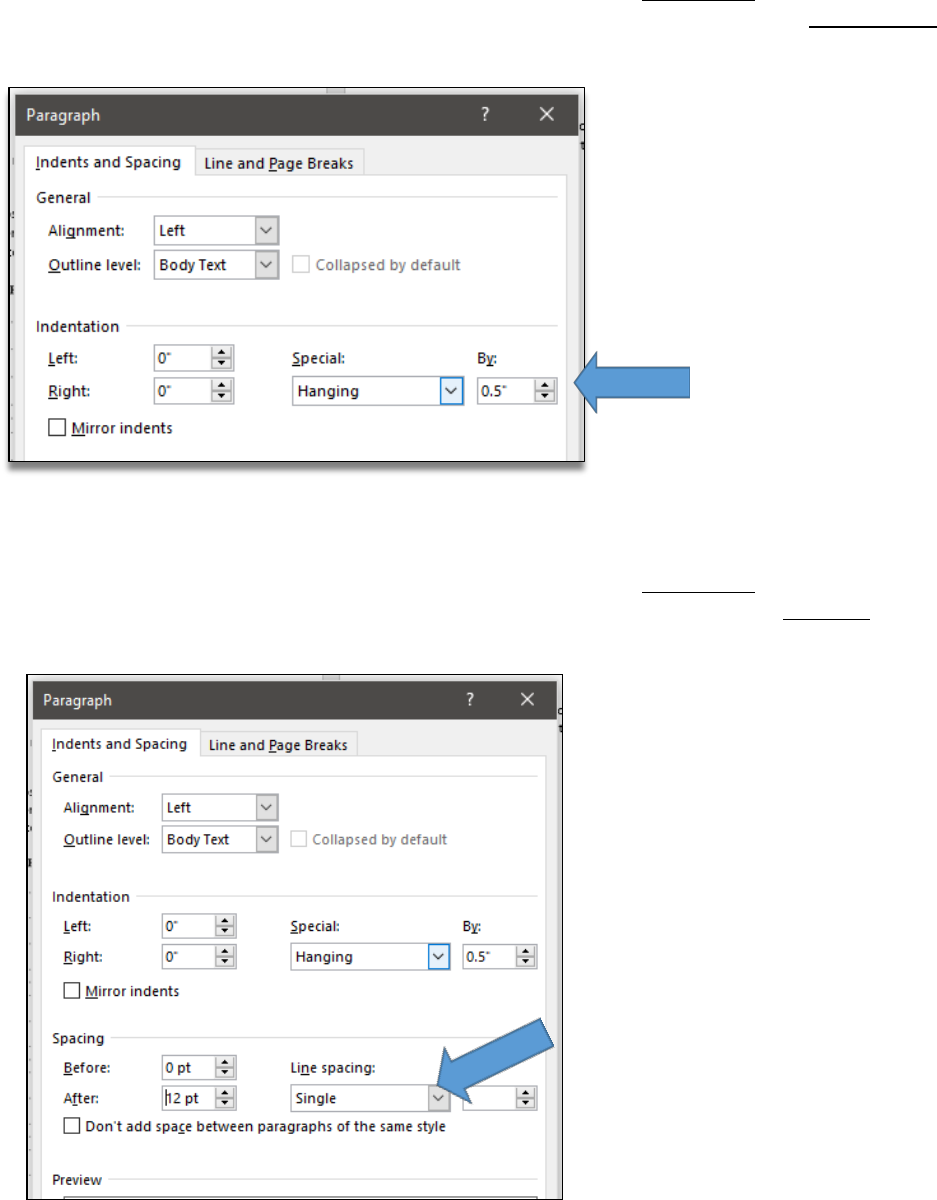
References should be single-spaced, and indenting conventions should be
consistent.
Following is an example of a consistent indenting convention:
In the Table of
Contents, the
References entry must
be formatted
consistently with other
major heading entries.
35
If you are generating your References list manually, use Paragraph settings to
ensure indenting conventions are consistent. Using the example, go to Indentation,
and set Special at Hanging, 0.5”.
There may be a single- or double-space between entries.
If you are generating your References list manually, use Paragraph settings to
ensure consistent spacing between entries. Using the example, go to Spacing, and
set After at 12 pt and Line spacing at Single.
36
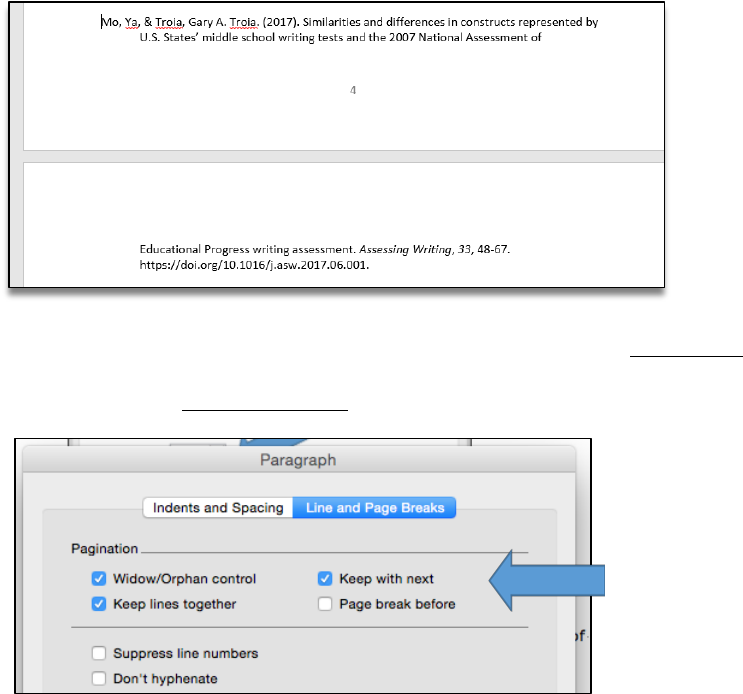
Entries should not break across a page.
When an entry breaks across a page, it begins at the bottom of one page and ends
at the top of the next.
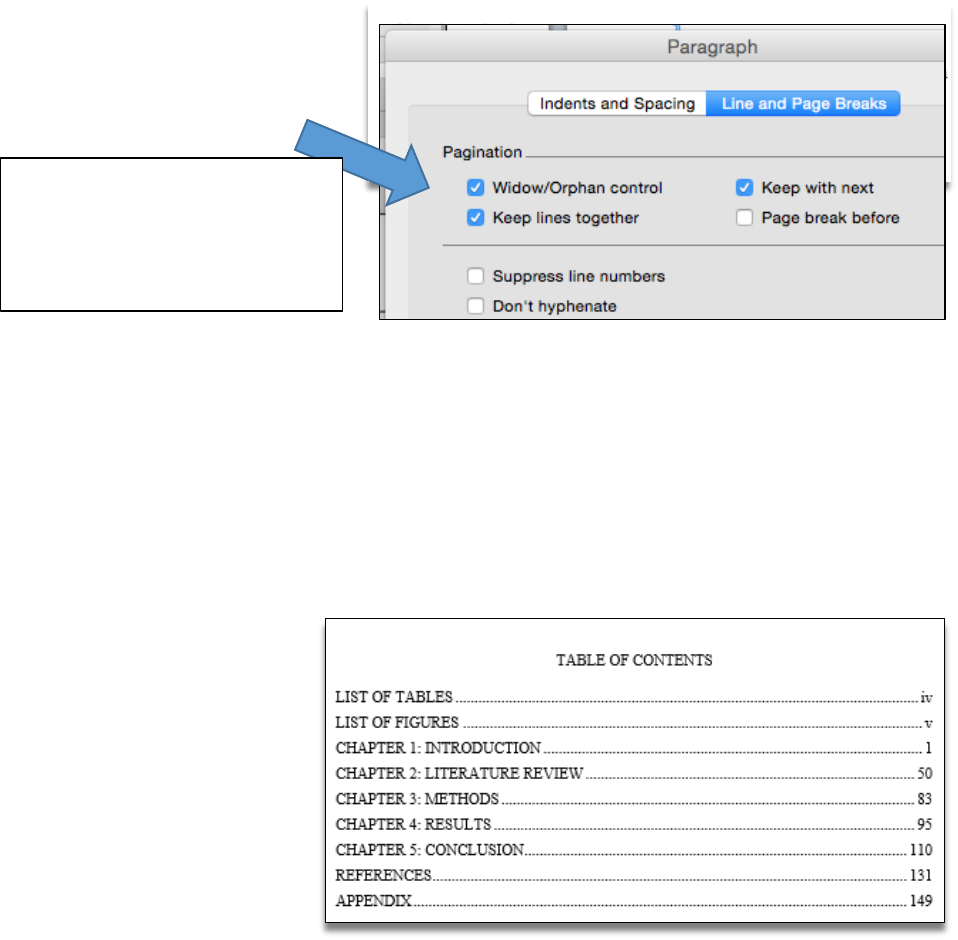
If you are generating your References list manually, use Paragraph settings to
ensure breaks like this don’t occur. Using the example, go to Line and Page Breaks,
and makes sure Keep with next is checked.
